
In case you’ve ever tried sharing your weblog posts on LinkedIn manually, then you know the way time-consuming it may be. Switching between platforms, pasting content material, and making an attempt to maintain a daily schedule takes extra effort than it ought to.
I’ve been on the lookout for methods to share extra persistently on LinkedIn, and that’s once I realized WordPress might assist. With the appropriate setup, I don’t have to fret about lacking posts or spending hours making an attempt to remain on observe.
On this information, I’ll stroll you thru the 2 strategies I’ve used. One provides you extra management when you wish to plan every thing out, and the opposite runs quietly within the background so you’ll be able to keep constant with out further effort.
Why Schedule LinkedIn Posts in WordPress?
Scheduling LinkedIn posts in WordPress helps you keep constant and attain your viewers on the proper time. You may plan, publish, and promote posts immediately out of your WordPress dashboard with no need to change platforms.
This protects you from the effort of logging in to LinkedIn individually or copying and pasting your content material.
It additionally makes it simpler to hit these “golden hours” when there’s essentially the most exercise on LinkedIn—even when you’re busy working in your website.
Listed below are some key advantages of scheduling LinkedIn posts in WordPress:
Keep constant – Hold your publishing circulation regular with out juggling a number of apps.
Submit at the most effective occasions – Share updates when your viewers is most energetic, even when you’re offline.
Plan strategically – Align your LinkedIn posts along with your WordPress content material calendar so every thing works towards your corporation targets.
Scale back stress – Batch-create LinkedIn updates whereas writing your weblog posts, as a substitute of scrambling to put up one thing on the final minute.
Plus, this strategy works for a variety of WordPress web sites.
Right here’s a fast overview of the way you would possibly be capable of profit, primarily based on the kind of web site you run:
The very best half is that you are able to do all this proper inside WordPress. You may both select an all-in-one answer and handle a number of platforms from a single dashboard or automate posts immediately out of your website.
Unsure which one’s best for you? Don’t fear – I’ll stroll you thru each so you’ll be able to see which strategy matches your workflow.
Which Methodology Ought to You Select?
The precise instrument for scheduling LinkedIn posts in WordPress depends upon the way you wish to work:
Methodology 1: ClickSocial. If you would like an all-in-one answer, ClickSocial allows you to schedule posts throughout a number of social platforms, together with LinkedIn. You may also use Fast Share to routinely publish a LinkedIn put up everytime you publish a brand new weblog put up.
Methodology 2: Uncanny Automator. In case you desire a extra hands-off strategy, Uncanny Automator could be a greater match. When you arrange an automation recipe, it would routinely share your WordPress posts to LinkedIn the second they’re printed.
Now, I’ll share two strategies for scheduling LinkedIn posts in WordPress.
Right here’s a fast overview of all of the issues I’ll cowl on this information:
Methodology 1: Schedule LinkedIn Posts Utilizing ClickSocial
ClickSocial is the most effective WordPress social media scheduling plugin, particularly for newbies and busy website homeowners who need every thing in a single place. With its visible calendar, you’ll be able to simply plan, schedule, and modify your posts as wanted.
This setup works particularly properly for bloggers and enterprise homeowners who need a clear overview of their content material throughout completely different social media platforms.
On our accomplice model web sites, we use ClickSocial to streamline social scheduling, and it’s been a dependable time-saver. You may learn our full ClickSocial assessment to see all the small print.
Step 1: Create Your ClickSocial Account & Get Your API Key
First, you’ll must create your ClickSocial account earlier than putting in the plugin.
Head over to the ClickSocial web site and click on the ‘Signal Up’ button. Then, you’ll be able to merely full the registration course of and make observe of your login credentials.

After you’ve signed up, you’ll wish to get your API key so you’ll be able to join it to your WordPress website.
In your ClickSocial dashboard, search for the ‘Generate API Key’ button and click on it.

This may take you to the API Keys web page.
Go forward and click on on the ‘Add New’ button.

Within the popup that seems, you’ll must enter a reputation on your API key. I like to recommend utilizing one thing clear, like your web site or mission identify, so you’ll be able to simply bear in mind what it’s for later.
With that performed, you’ll be able to click on the ‘Generate API Key’ button.

On the subsequent display, you’ll see your distinctive API key.
Be sure you copy this API key and retailer it in a protected place, like a password supervisor. To your safety, ClickSocial will solely present the complete key this one time.

Step 2: Set up and Join ClickSocial With Your WordPress Web site
Now, you’re prepared to put in and activate the ClickSocial WordPress plugin.
You may navigate to your WordPress dashboard and go to Plugins » Add New Plugin.

Within the search bar on the prime, kind “ClickSocial” and press Enter.
Once you see the plugin seem within the outcomes, click on ‘Set up Now.’

As soon as the set up is completed, hit ‘Activate.’ For extra detailed directions, see our information on the best way to set up a WordPress plugin.
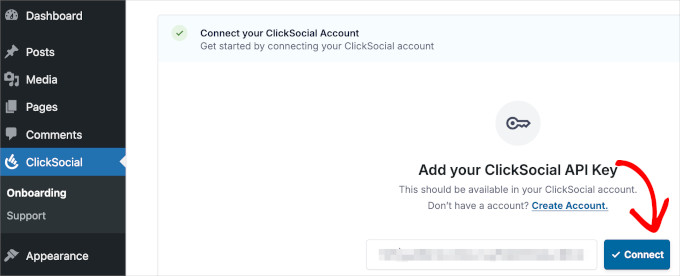
Subsequent, the ClickSocial setup wizard will ask you to hyperlink your WordPress website utilizing your distinctive API key.
In case you by chance navigate away, merely go to ‘Onboarding’ beneath the ‘ClickSocial’ tab. Enter your API key and click on the ‘Join’ button.
Step 3: Join Your LinkedIn Account to ClickSocial
Now that your web site is linked to ClickSocial, you’ll be able to join your LinkedIn account.
Out of your WordPress dashboard, go to ‘ClickSocial’ to proceed with the setup wizard. Below step 2, click on the ‘Add Account’ button to get began.

A popup will show the social media platforms you’ll be able to join, corresponding to LinkedIn, Instagram, Fb, and X (previously Twitter).
For this tutorial, let’s choose the LinkedIn possibility.

This may open a brand new window the place you’ll be able to log in to LinkedIn and provides ClickSocial permission to put up for you.
Click on ‘Enable’ to grant these permissions. Bear in mind, that is utterly protected, and you’ll revoke entry at any time inside your LinkedIn settings.

After authorizing the connection, you’ll want to decide on your timezone settings.
You may both use ClickSocial’s linked account timezone or stick along with your WordPress website’s timezone setting.

Click on ‘End Setup’ to finish the onboarding course of and the LinkedIn integration.
It is best to now see your LinkedIn account listed in ClickSocial » Settings within the ‘Linked Accounts’ tab beneath ‘Workspace.’

Step 4: Set Up Your LinkedIn Submit Calendar
After connecting your LinkedIn account, ClickSocial will show your put up calendar, so you’ll be able to management your complete LinkedIn posting schedule.
The calendar view exhibits you precisely when your posts will go dwell and helps you see any gaps in your posting schedule.
You may see scheduled posts, printed posts, drafts, and even handle approval queues when you’re working with a staff.

To arrange your default posting occasions, click on the ‘Edit Schedule’ button on the prime of the calendar.
This manner, you don’t have to select a time each time you write a brand new weblog put up.

From right here, choose the checkboxes on the left facet to pick which days of the week you wish to put up on LinkedIn.
I sometimes select Monday by means of Friday since that’s when my viewers is most energetic.

When you’ve chosen your posting days, use the dropdown menus on the appropriate to set particular time slots for every day.
You may add a number of time slots per day utilizing the plus (+) icon or take away undesirable slots with the purple trash icon.

That stated, I like to recommend beginning with one put up per day throughout enterprise hours – round 9 AM or 1 PM works properly for many industries.
You may at all times modify these occasions later primarily based in your viewers’s engagement patterns.
Once you’re pleased with every thing, go forward and click on ‘Save Modifications’ to use your new posting schedule.
🧑💻 Professional Tip: Even with a set schedule, you’ll be able to nonetheless select customized occasions for particular person posts. I’ll present you ways within the subsequent step.
Step 5: Schedule Your LinkedIn Posts in WordPress
Now, you can begin creating and scheduling your LinkedIn content material. ClickSocial’s put up composer makes this easy, even when you’re new to social media scheduling.
So as to add a brand new put up, you’ll be able to click on the plus (+) icon subsequent to an obtainable time slot in your calendar.

Within the ClickSocial put up composer, merely kind your LinkedIn put up content material immediately into the textual content discipline.
Under the textual content space, you’ll see a number of icons for including different components to your put up:
Picture – add photographs out of your media library.
Hyperlink – add a hyperlink to present WordPress weblog posts.
Video – embed movies that help your message.
For this tutorial, I’ll add a hyperlink to an present WordPress weblog put up, so I’ll click on on the ‘WordPress’ icon.

Within the popup that seems, you’ll select a WordPress put up to auto-schedule.
Merely click on on the put up you wish to add.

You may select a couple of hyperlink if it’s worthwhile to. However I like to recommend deciding on just one put up to maintain your content material targeted.
After that, scroll down the popup and click on the ‘Add to Schedule’ button.

It is best to now see the hyperlink connected within the put up composer.
From right here, you’ll be able to swap to the ‘Preview’ tab to see precisely how your content material will seem on LinkedIn.

If something wants altering, you’ll be able to return to the composer to fine-tune the textual content or add hashtags.
Once you’re completely happy along with your draft, click on the ‘Schedule’ button on the backside.
In case you’d quite put up at a customized time, simply use the dropdowns subsequent to ‘Publish’ to select the date and time you need.

Within the popup that seems, go forward and choose your required publishing date from the calendar.
Then, click on ‘Schedule for customized time.’

From the dropdown, you’ll be able to specify the precise hour and minute.
After that, click on the ‘Add time to Schedule’ button to substantiate.

This may deliver you again to the put up composer, the place you can provide your scheduled put up one other look. You may also swap to the ‘Preview’ tab to double-check every thing.
And whenever you’re prepared, you’ll be able to hit the ‘Schedule’ button.

And that’s it! You may repeat this course of for any weblog posts you’d wish to schedule and share on LinkedIn.
Once you’re completed, you’ll see all of your upcoming posts within the ‘Scheduled’ tab. Right here, I’ve a weblog put up set for the default slot and one other scheduled at a customized time.

ClickSocial will routinely put up your LinkedIn content material on the time you’ve set.
Right here’s my demo scheduled LinkedIn put up for instance:

Step 6: (Optionally available) Fast-Share Your WordPress Submit to LinkedIn
Need your new WordPress posts to go straight to LinkedIn? With ClickSocial, you are able to do that by establishing Fast Share.
As a substitute of making every LinkedIn put up from scratch, Fast Share generates one for you as quickly as you publish a weblog put up.
To set it up, navigate to ClickSocial » Settings » Fast Share out of your WordPress dashboard.
As soon as inside, you’ll be able to go forward and toggle on ‘Share from Gutenberg Editor.’

Subsequent, you’ll be able to select what ought to occur when a weblog put up is printed:
Share instantly – publish to LinkedIn the second your weblog goes dwell.
Schedule for the subsequent obtainable slot – match the put up into your present posting calendar (you set this up in step 5).
Add to Drafts – reserve it for assessment so you’ll be able to edit earlier than posting.
For this tutorial, I’ll choose ‘Share instantly’ so my LinkedIn put up goes dwell concurrently my weblog put up.

You may then scroll all the way down to the ‘Account’ part.
Right here, click on in your LinkedIn account’s field, then as soon as once more on the ‘Edit’ button to open the put up composer.

Within the popup, you’ll be able to construct a template with dynamic variables like put up title, hyperlink, excerpt, and extra.
This ensures your LinkedIn put up auto-generates primarily based in your weblog content material.

When every thing appears good, don’t overlook to avoid wasting your settings.
Now, everytime you publish a put up, you’ll see the ClickSocial Share button in your WordPress content material editor.

Clicking it would open a preview of your LinkedIn put up.
From right here, you may make ultimate tweaks, like reviewing textual content, fixing formatting, or including hashtags.

As soon as every thing appears good, you’ll be able to hit ‘Share Now’ (or select to schedule it for later).
ClickSocial will then publish your put up in accordance with the settings you’ve chosen. Right here’s an instance of my automated LinkedIn put up:

Methodology 2: Publish LinkedIn Posts Utilizing Uncanny Automator
Uncanny Automator is good when you’d quite have your WordPress posts despatched to LinkedIn routinely as quickly as they’re printed. It really works by means of “recipes,” that are automated workflows that set off an motion, like posting to LinkedIn.
For extra info, see our full Uncanny Automator assessment.
Step 1: Set up and Activate Uncanny Automator
First, it’s worthwhile to set up the Uncanny Automator plugin in your WordPress website. The plugin affords each free and professional variations, however the free model consists of every thing you want for fundamental LinkedIn automation.
📝 Be aware: Whereas the free plugin is ideal for this job, Uncanny Automator Professional unlocks extra superior workflows. For instance, you possibly can add a 24-hour delay earlier than sharing a put up or solely share posts from a particular class.
To put in the plugin, navigate to Plugins » Add New Plugins in your WordPress dashboard.
Then, you’ll be able to seek for “Uncanny Automator” within the plugin listing.
When you’ve discovered it, click on ‘Set up Now’ and look forward to the set up to finish, then click on ‘Activate’ to allow the plugin.
In case you need assistance, please see our full information on the best way to set up a WordPress plugin.

After activation, you’ll see a brand new Automator menu merchandise in your WordPress dashboard. That is the place you’ll create and handle all of your automated workflows.
However first, let’s arrange your free Uncanny Automator account, because you gained’t be capable of connect with LinkedIn with out it.
Let’s head over to ‘Automator’ and click on the ‘Join your free account!’

On the subsequent display, you’ll see a registration kind. Merely fill within the required particulars, and also you’ll be good to go.
Step 2: Create a New Recipe for LinkedIn Automation
With Uncanny Automator arrange, you’re able to create your first automation recipe.
In your WordPress dashboard, go to Automator » Add new recipe.

A popup will seem asking what kind of recipe you’d wish to create.
Right here, you’ll wish to choose ‘Logged-in customers’ from the choices.
This makes certain the automation solely runs whenever you or one other trusted consumer publishes a put up. It prevents unintentional triggers from visitor contributors or different consumer actions.

Subsequent, you’ll want to offer your recipe a descriptive identify so it’s simple to acknowledge later.
One thing like “Share New WordPress Weblog Posts to LinkedIn” or “LinkedIn Automation” works properly, because it reminds you precisely what the recipe does.
Plus, having a transparent naming system actually helps when you begin creating extra recipes for various platforms or content material sorts.

With that performed, you’ll be able to click on ‘Save’ to proceed to the recipe configuration display.
Step 3: Configure Your Automation Set off
A set off is what tells Uncanny Automator when to run your recipe. On this case, you’ll need it to fireside everytime you publish a brand new weblog put up in your WordPress website.
Within the Set off part, you’ll see an inventory of accessible integrations. Go forward and select ‘WordPress’ because the automation relies on WordPress exercise.

Within the dropdown menu that seems, let’s choose ‘A consumer publishes a put up.’
This particular set off ensures your recipe solely runs when content material goes from draft to printed standing.

Uncanny Automator will then immediate you to pick which put up kind ought to set off the automation.
In case you solely wish to share common weblog posts, choose ‘Submit’ from the dropdown menu.

However when you additionally publish different content material sorts like case research or portfolios that you simply’d wish to share on LinkedIn, choose ‘Any put up kind’ as a substitute. This offers you extra flexibility as your content material technique grows.
When you’ve configured your set off settings, don’t overlook to click on ‘Save.’
Step 4: Configure Your LinkedIn Auto-Share Motion
Now, you’re able to arrange LinkedIn auto-sharing. On this step, you’ll inform Uncanny Automator what ought to occur every time a put up is printed.
Within the ‘Actions’ part, click on ‘Add motion’ to get began.

This may open the listing of accessible integrations.
You may scroll down and choose ‘LinkedIn’ from the menu.

If that is your first time connecting LinkedIn to Uncanny Automator, you’ll see a ‘Join account’ button within the popup that seems.
Go forward and click on it.

LinkedIn will then ask you to substantiate that Uncanny Automator can put up for you.
Click on ‘Enable’ to grant the required permissions. This course of is totally safe, and you’ll at all times handle or revoke this entry out of your LinkedIn account settings.

After connecting your LinkedIn account, Uncanny Automator will take you to the recipe editor.
From right here, let’s choose ‘Publish a put up with a picture to a LinkedIn web page’ from the motion dropdown. This manner, every LinkedIn put up can have a featured picture to assist make it stand out.

You may then inform Uncanny Automator which picture to make use of on your LinkedIn put up. One of the best ways to do that is to make use of the put up’s featured picture, so each new article can have its personal distinctive visible.
To set this up, click on the asterisk (*) button subsequent to the ‘Picture URL’ discipline. This may open an inventory of dynamic tokens. Seek for ‘Submit Featured Picture URL’ and choose it.
Now, your put up’s featured picture will likely be routinely included in your LinkedIn put up.

🧑💻 Professional Tip: For the most effective outcomes on LinkedIn, be sure that your featured photos are at the least 1200 x 627 pixels. This ensures your picture appears sharp {and professional} within the feed.
For extra social media picture sizes, see our full social media cheat sheet.
Alternatively, if you would like each put up to make use of the identical default featured picture, you’ll be able to paste a particular picture URL out of your Media Library into this discipline as a substitute of utilizing a token.
No worries when you don’t know the URL as a result of you’ll be able to seize it out of your Media Library.
All you need to do is open your WordPress media library in a brand new tab, click on on the picture you wish to add, and duplicate the worth from the ‘File URL’ discipline.

After setting the picture, you’ll be able to create a template on your put up’s textual content within the ‘Content material’ discipline. You should use a mixture of your personal phrases and dynamic tokens, which routinely pull info out of your WordPress put up.
So as to add tokens, click on the asterisk (*) button and seek for the one you want. For instance, you would possibly wish to search for ‘Submit Title’ and ‘Submit URL’ and choose them as your token.
Right here is an easy template you need to use: “New on the Weblog: {Submit Title} We’ve simply printed a recent article full of ideas you gained’t wish to miss! 🚀 Learn it right here: {Submit URL}.”
If you would like, you’ll be able to add some hashtags, like WordPress #LinkedInTips. However make sure they’re appropriate for your entire automated LinkedIn posts.

This manner, your LinkedIn put up will routinely embody your put up title and hyperlink, together with hashtags when you add them.
With that performed, you’ll be able to click on ‘Save’ to retailer your LinkedIn auto-share motion settings.
Step 5: Activate Your LinkedIn Automation Recipe
At this level, your recipe is full and able to routinely share your weblog posts on LinkedIn.
However within the recipe editor, you’ll discover the switches are set to ‘Draft.’ That simply means the automation is created however not energetic but.
You may go forward and swap all of the toggles from ‘Draft’ to ‘Stay.’

That’s it! Your recipe now runs within the background, taking good care of LinkedIn everytime you publish new content material.
Right here’s what my demo automated LinkedIn put up appears like:

You may view all of your energetic recipes by going to Automator » All Recipes in your WordPress dashboard.
From there, you’ll be able to pause or replace them anytime.

Bonus Tip: Develop LinkedIn Followers and Engagement with Giveaways
Working giveaways can be an effective way to develop your LinkedIn viewers and increase engagement in your posts.
Folks love the prospect to win one thing free of charge. And by tying the entry necessities to easy actions (like following your LinkedIn Web page or participating with a put up), you’ll be able to shortly increase your attain.
Listed below are a number of good targets you’ll be able to set on your giveaway:
Develop followers – Require entrants to observe your LinkedIn Web page to take part.
Enhance put up engagement – Ask contributors to touch upon or share your put up on LinkedIn.
Improve model consciousness – Encourage referring mates or colleagues who could be keen on your services or products.

To run the giveaway, I like to recommend utilizing RafflePress, which is the most effective WordPress contest and giveaway plugin.
We use it to run our annual WPBeginner birthday giveaway, and it’s been working tremendous properly for us. See our full RafflePress assessment for extra insights in regards to the plugin.
And for step-by-step directions, you’ll be able to see our information on the best way to run a giveaway/contest in WordPress.
FAQs About Methods to Schedule LinkedIn Posts in WordPress
Nonetheless have questions? Listed below are solutions to a few of the commonest questions I get about scheduling LinkedIn posts in WordPress.
How do I routinely put up from WordPress to LinkedIn?
You’ve two major choices for routinely posting from WordPress to LinkedIn:
ClickSocial – Greatest if you would like scheduling flexibility for LinkedIn and different social platforms.
Uncanny Automator – Greatest when you desire prompt sharing immediately from WordPress.
Each combine easily with LinkedIn as soon as your account is linked, providing you with two easy methods to streamline your workflow.
How can I sustain with posting each day on social media?
The trick is batching and scheduling. As a substitute of logging in on daily basis, put aside one block of time every week to write down and schedule your LinkedIn posts. With the appropriate plugin, you’ll be able to line up a complete week’s value of content material and let WordPress deal with the publishing.
Can I exploit the identical content material throughout a number of platforms?
Sure, however with a twist. You may repurpose your WordPress weblog put up for LinkedIn, X (Twitter), or Fb. Simply be sure that to regulate the tone, hashtags, or picture measurement for every platform so your content material feels native all over the place.
What’s the finest put up scheduler plugin for WordPress?
The very best social media scheduling plugin actually depends upon your workflow. If you would like an all-in-one, beginner-friendly instrument that allows you to plan and schedule posts throughout a number of platforms with out leaving WordPress, ClickSocial is the way in which to go.
However when you’d quite automate issues so your new weblog posts go straight to LinkedIn, Uncanny Automator is the right ‘set it and overlook it’ answer.
Are you able to add a LinkedIn feed to a WordPress website?
Sure, you’ll be able to, however LinkedIn’s choices are extra restricted than these of different social platforms. LinkedIn’s official instruments don’t simply permit for dynamic, multi-post feeds like you’ll be able to create for Instagram or Fb.
Essentially the most dependable methodology is to manually embed particular person posts by copying the embed code for a particular put up immediately from LinkedIn and pasting it into your WordPress put up or web page.
Hold Studying: Social Media and WordPress Suggestions
I hope this information has helped you schedule LinkedIn posts in WordPress. Nevertheless, this is only one technique to increase your social media presence.
If you wish to take your social media technique even additional, listed here are some extra guides that can assist you get began:
In case you preferred this text, then please subscribe to our YouTube Channel for WordPress video tutorials. You may also discover us on Twitter and Fb.

