

Are you wanting so as to add dynamic content material to your WordPress web site?
Including dynamic content material to your web site allows you to present guests with customized experiences, suggestions, and different interactive parts. That means dynamic content material may help enhance consumer engagement and conversions.
On this article, we are going to present you methods to simply add dynamic content material in WordPress.
Why Add Dynamic Content material in WordPress?
Dynamic textual content refers to content material that adjustments on a web site relying on various factors, together with consumer habits, time, location, identify, and extra.
Organising dynamic textual content allows customers in your WordPress web site to see totally different messages in response to various factors.
For instance, you should use dynamic textual content to show the identify of the consumer who’s presently logged in to your web site.

Exhibiting customized content material can maintain guests engaged in your website for longer intervals, which may cut back the bounce charge and enhance your website’s search engine optimisation rankings.
It will probably even assist convert customers into clients or subscribers by displaying that your web site cares about its guests, which creates a constructive impression and builds belief.
Plus, dynamic content material can enhance gross sales and signups in your web site. For instance, you possibly can present the present date dynamically for a countdown sale or low cost provide, and it’ll robotically replace every day. This will create a way of urgency and result in extra conversions.
That being mentioned, let’s check out methods to add dynamic content material in WordPress. You need to use the fast hyperlinks beneath to leap to the strategy you want to use:
Methodology 1: Create a Dynamic Touchdown Web page Utilizing SeedProd
If you wish to create a touchdown web page with dynamic content material, then this technique is for you.
SeedProd is the very best WordPress web page builder available on the market that helps you create engaging touchdown pages and themes with out utilizing any code.
It additionally comes with a dynamic textual content function that means that you can add dynamic content material to your headings and textual content.

First, you have to to put in and activate the SeedProd plugin. For extra particulars, you could wish to see our newbie’s information on methods to set up a WordPress plugin.
Be aware: SeedProd additionally has a free model, however it doesn’t have the dynamic textual content function. So, for this tutorial, we’re utilizing the SeedProd Professional plugin.
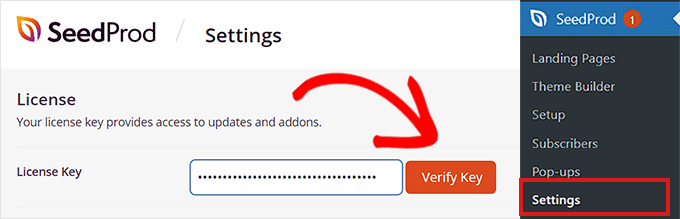
Upon activation, head over to the SeedProd » Settings web page to enter the plugin license key.
You could find this info below your account on the SeedProd web site.
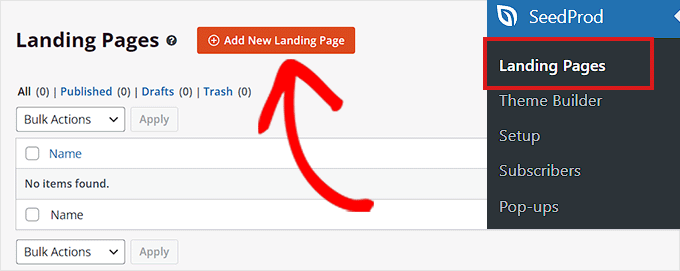
Subsequent, you want to go to SeedProd » Touchdown Pages from the WordPress admin sidebar.
As soon as you might be there, click on on the ‘Add New Touchdown Web page’ button.
It will direct you to the ‘Select a New Web page Template’ display screen, the place you possibly can choose any of the pre-made templates in your touchdown web page.
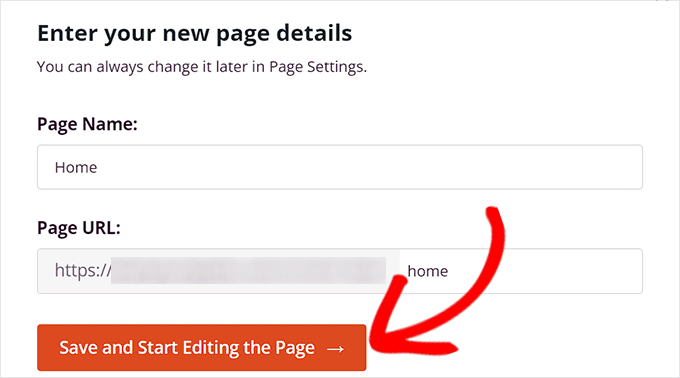
Upon template choice, you’ll be requested to enter a web page identify and select a URL.
After coming into this info, simply click on on the ‘Save and Begin Enhancing the Web page’ button to proceed.
It will launch SeedProd’s drag-and-drop web page builder, the place now you can begin modifying your web page. For extra detailed directions, you could wish to see our information on methods to create a touchdown web page in WordPress.
Subsequent, merely drag and drop the Heading or Textual content block from the left sidebar onto the touchdown web page. Then, click on on the block to open up its settings within the left sidebar.
After getting carried out that, you want to click on the ‘Insert Dynamic Textual content’ button.

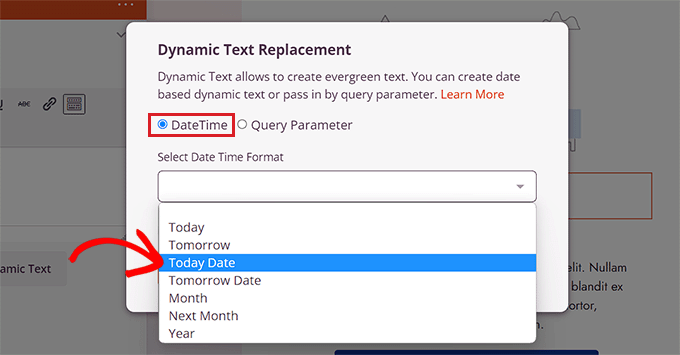
It will open up a ‘Dynamic Textual content Alternative’ immediate on the display screen.
From right here, you need to choose the ‘DateTime’ choice if you wish to arrange a time or date dynamically. This may be useful if you wish to show the time restrict for a sale or low cost provide in your web site.
After that, merely choose a date format from the dropdown menu and click on the ‘Insert’ button.
For those who don’t see your most popular format within the dropdown menu, then you possibly can click on on the ‘Study Extra’ hyperlink on the high to see different codecs.
If you wish to add a location, identify, nation, a number of language help, web page title, electronic mail handle, postal code, or different dynamic content material, then you want to choose the ‘Question Parameter’ choice.
After that, add the dynamic textual content issue below the ‘Parameter Identify’ choice.
As an example, in case you add dynamic textual content for names within the ‘Parameter Identify’ choice, then everybody who’s logged into your website might be proven their identify like ‘Hey John’ as a substitute of ‘Hey There’ on the web page.
Or in case you add dynamic textual content for an electronic mail handle, then customers might be proven their electronic mail handle in your touchdown web page each time they log in.
Equally, if you wish to show the placement of each consumer dynamically, then you possibly can enter ‘location’ because the parameter identify.
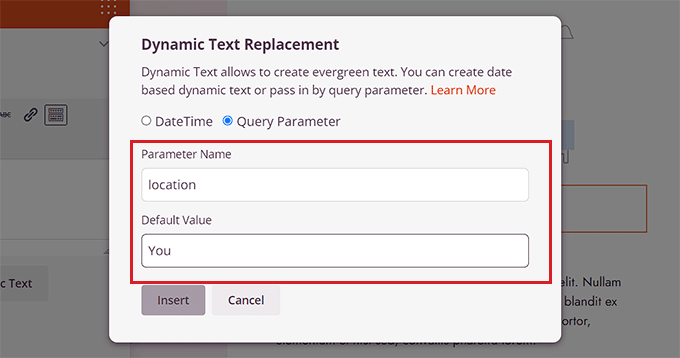
Subsequent, add the default worth that the dynamic textual content will revert to if the placement just isn’t accessible within the URL parameter.
For instance, if a customer opens up your website and their location just isn’t accessible within the URL, then the dynamic textual content would possibly say ‘Shops Close to You’ as a substitute of ‘Shops Close to Florida’.
After that, merely click on the ‘Insert’ button so as to add the dynamic textual content.
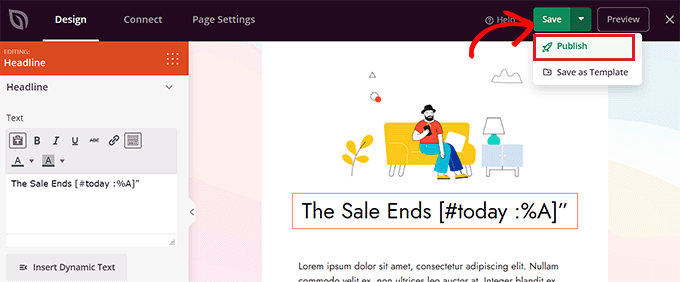
After getting carried out that, click on the ‘Save’ button on the high to retailer your settings. Lastly, click on the ‘Publish’ button to make your touchdown web page dwell.
Now go to your web site to take a look at the dynamic content material in motion.
That is what it seemed like on our demo web site.

Methodology 2: Add Dynamic Content material Utilizing OptinMonster
If you wish to add dynamic content material to your promoting campaigns, together with popups or floating bars, then this technique is for you.
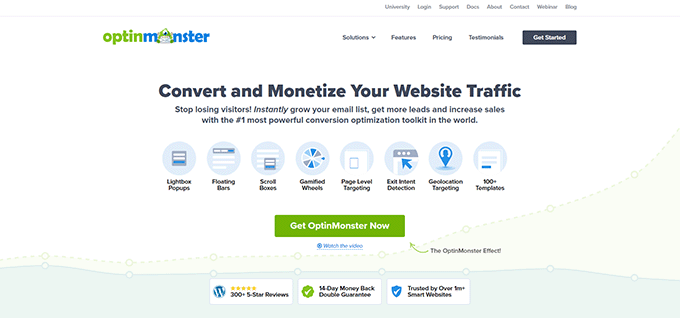
OptinMonster is the very best lead era and conversion optimization instrument available on the market. It means that you can present customized campaigns to customers with out utilizing any code.
It additionally comes with a dynamic textual content alternative function that allows you to add dynamic content material to your campaigns utilizing good tags.
First, you have to to enroll in an OptinMonster account as a result of the paid instrument means that you can add dynamic content material.
Merely go to the OptinMonster web site and click on the ‘Get OptinMonster Now’ button to arrange an account.
Subsequent, you must set up and activate the free OptinMonster plugin in your WordPress web site. For extra detailed directions, please see our tutorial on methods to set up a WordPress plugin.
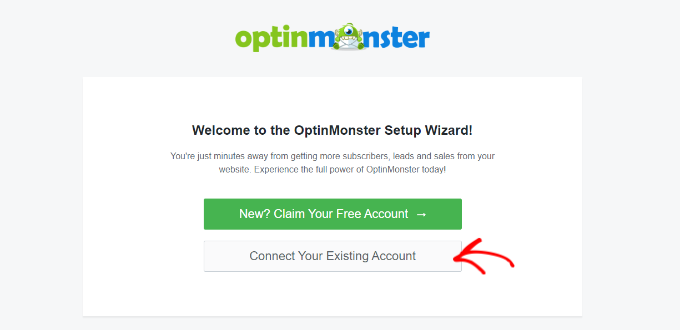
Upon activation, you will notice the OptinMonster setup wizard within the WordPress admin panel.
From right here, click on the ‘Join Your Current Account’ button to attach your WordPress website to your OptinMonster account.
After that, a brand new window will open up on the display screen.
Merely click on the ‘Connect with WordPress’ button to maneuver forward.

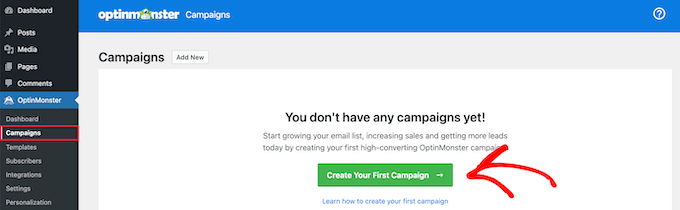
After getting linked your OptinMonster account with WordPress, head over to the OptinMonster » Campaigns web page from the WordPress admin sidebar.
Subsequent, you want to click on on the ‘Create Your First Marketing campaign’ button to begin a marketing campaign.
It will take you to the ‘Templates’ web page, the place OptinMonster presents totally different marketing campaign varieties that you should use to indicate varied varieties of content material or focused messages to your customers.
These embrace popups, floating bars, gamified campaigns, inline campaigns, slide-in popups, and extra.
As an example, if you wish to present dynamic content material inside a WordPress publish or web page, then you possibly can select the Inline marketing campaign sort.
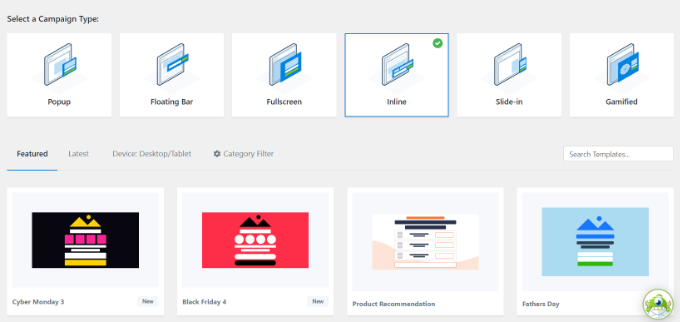
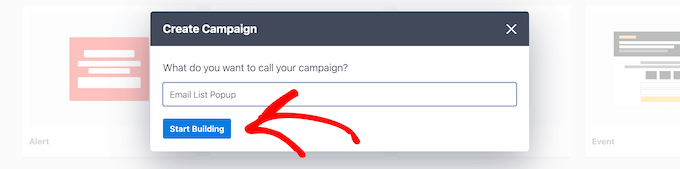
After deciding on a marketing campaign sort, you possibly can select any of the pre-made templates for that particular marketing campaign.
You’ll then be requested to enter a reputation for it and click on the ‘Begin Constructing’ button.
It will take you to OptinMonster’s marketing campaign builder interface. It’s a drag-and-drop instrument the place you possibly can design your marketing campaign with a dwell preview.
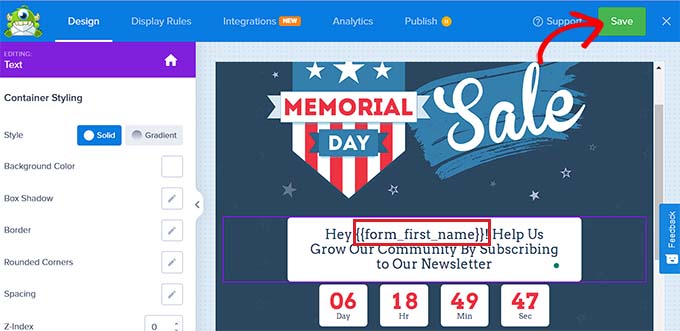
From right here, drag and drop the Textual content or Heading block from the sidebar on the left into the marketing campaign. After that, simply choose some textual content within the block to open up the textual content editor on the high of it.
Subsequent, you could click on the ‘Sensible Tags’ icon on the proper nook of the textual content editor to open up a dropdown menu with an inventory of good tags
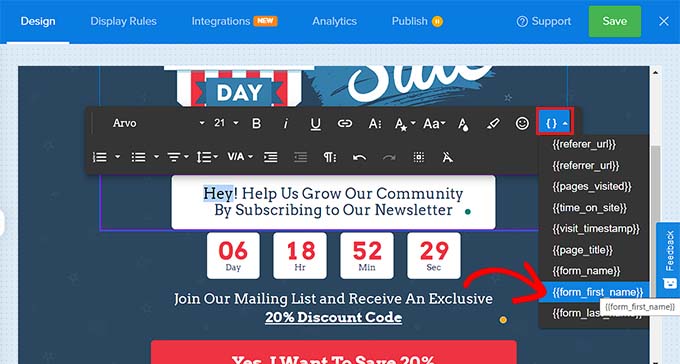
From right here, you possibly can choose any of the good tags so as to add dynamic content material to your marketing campaign.
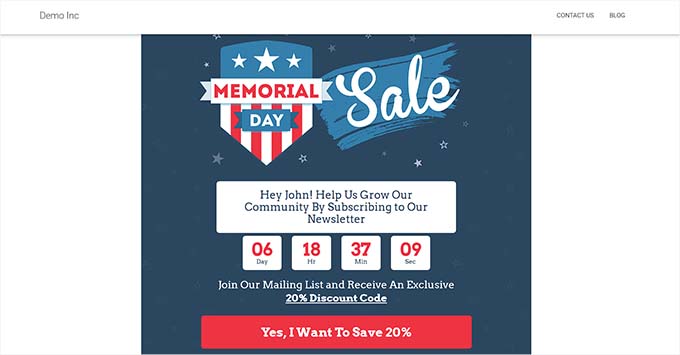
As an example, you should use the {{form_first_name}} good tag so as to add the identify of the consumer on the high to make the marketing campaign really feel extra customized.
Now, all of the logged-in customers in your website will see their names within the marketing campaign.
There are different good tags that present the marketing campaign identify, electronic mail handle, postal code, nation, province, yr, month, date, coupon code, web page URL, and extra.
For instance, utilizing the good tag for international locations will show the nation identify of every consumer who has logged in and is presently viewing your marketing campaign.
Equally, utilizing a date good tag will aid you show the time restrict for a sale with out manually updating it each time.
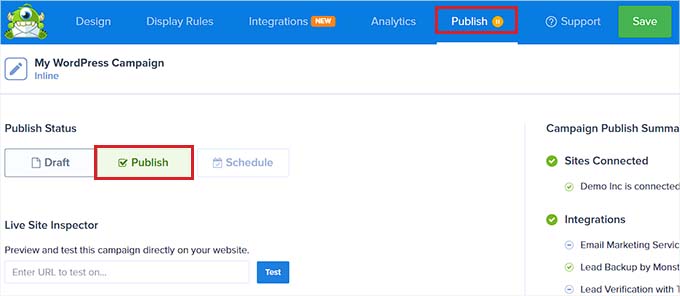
After getting chosen your good tag(s), simply click on the ‘Save’ button on the high to retailer your settings.
Lastly, change to the ‘Publish’ tab from the highest and click on on the ‘Publish’ button to make your marketing campaign dwell.
Now, you possibly can go to your web site to take a look at the marketing campaign with dynamic content material.
That is what it seemed like on our demo web site.
We hope this text helped you discover ways to add dynamic content material in WordPress. You may additionally wish to see our tutorial on methods to use dynamic discipline populations in WordPress to auto-fill kinds and our high picks for the very best electronic mail advertising and marketing companies for small companies.
For those who favored this text, then please subscribe to our YouTube Channel for WordPress video tutorials. You too can discover us on Twitter and Fb.
The publish Tips on how to Add Dynamic Content material in WordPress (Newbie’s Information) first appeared on WPBeginner.

