
Do you wish to edit WooCommerce pages with out writing code?
WooCommerce creates many pages to show merchandise and add cart performance to your retailer. Small enhancements to those pages can lead to increased gross sales and fewer cart abandonment on your retailer.
On this article, we’ll present you easy methods to simply edit WooCommerce pages to make extra gross sales with none coding expertise.
Why Edit WooCommerce Pages for Your On-line Retailer?
WooCommerce creates many pages to show merchandise, store, account, checkout, and cart options on your on-line retailer.
By default, your WordPress theme controls how these pages look. There are a ton of nice WooCommerce themes that you may select from.
Nonetheless, enhancing these pages is probably not as easy because it appears.
As an example, chances are you’ll not be capable to present extra merchandise, add upsell options, change the format, and extra.
That is the place SeedProd is available in. It’s the final WooCommerce web page builder plugin that lets you use an intuitive drag-and-drop instrument to design your WooCommerce pages.

The very first thing it is advisable do is set up and activate the SeedProd plugin. For extra particulars, see our tutorial on easy methods to set up a WordPress plugin.
For the totally different strategies on this article, we can be utilizing the SeedProd Professional model, because it has the options wanted to edit WooCommerce pages.
Upon activation, it is advisable go to SeedProd » Settings web page to enter your plugin license key. You will discover this info underneath your account on the SeedProd web site.
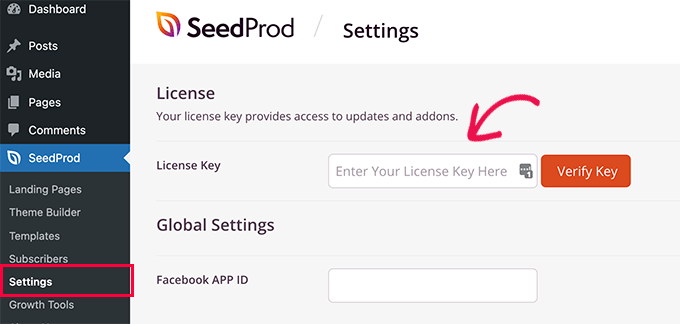
After getting into your license key, you might be good to go. Now you can edit and create extremely optimized WooCommerce pages on your on-line retailer.
That being stated, let’s check out easy methods to edit WooCommerce pages, step-by-step.
You possibly can click on any of the hyperlinks beneath to leap to any technique you need:
Create a Utterly Customized WooCommerce Theme
SeedProd comes with a whole WooCommerce theme builder built-in. This lets you exchange your WooCommerce theme with a customized one in all your personal.
The benefit of this method is that you just get extra flexibility when enhancing your WooCommerce theme. You possibly can edit any web page utilizing a easy drag-and-drop instrument.
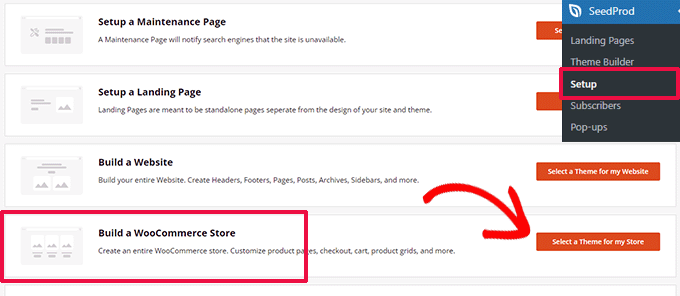
To get began, merely go to the SeedProd » Setup web page and click on on the ‘Choose a theme for my retailer’ button subsequent to the ‘Construct a WooCommerce Retailer’ possibility.
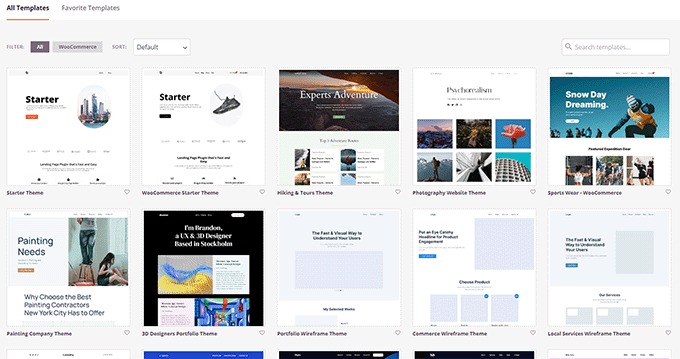
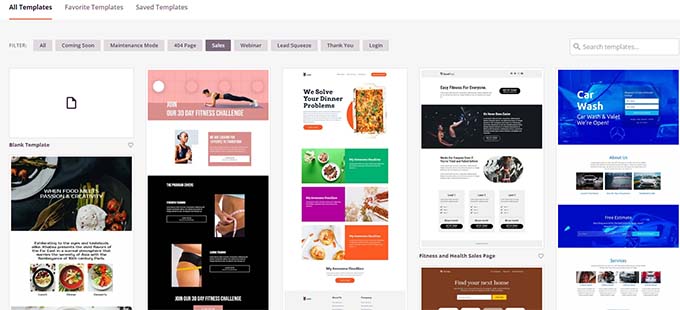
Subsequent, the plugin will present you a lot ready-to-use WooCommerce themes you should utilize as a place to begin.
Merely click on on a template to pick it.
Every WooCommerce or WordPress theme is a group of templates displaying totally different areas of your web site or on-line retailer.
SeedProd will now generate these templates on your theme and present you a listing of them.

Now you can take your mouse over to a template and click on on the ‘Edit Design’ hyperlink to begin enhancing it.
This can launch the SeedProd web page builder interface.
You possibly can add all of the widespread web site constructing blocks from the left column. To the appropriate, you will notice a stay preview of the web page you might be enhancing.
You may also merely level and click on on any merchandise to edit it.
SeedProd comes with all of the WooCommerce blocks that you will want to construct a sales-oriented WooCommerce theme.
As soon as you might be carried out making adjustments to a template, merely click on on the ‘Save’ button to retailer your adjustments.
Simply repeat the method to edit different templates in your customized WooCommerce theme.
Upon getting completed enhancing all of the pages, go to the SeedProd » Theme Builder web page and toggle the ‘Allow SeedProd Theme’ swap.
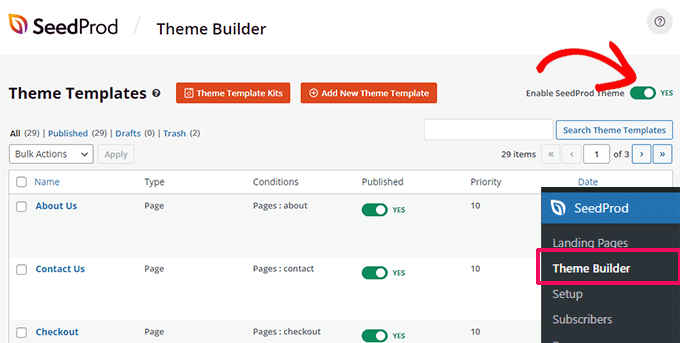
Your customized WooCommerce theme will now exchange your current WooCommerce theme.
Now, you’ll be able to go to your WordPress web site to see it in motion.

To be taught extra, see our full tutorial on easy methods to create a customized WordPress theme with out coding.
However, if you wish to hold utilizing your current WooCommerce theme and solely edit sure components of your web site, then proceed studying.
Customise the WooCommerce Checkout Web page
The checkout web page in any eCommerce retailer is likely one of the most vital steps within the buyer journey.
By default, WooCommerce comes with a plain checkout expertise, which isn’t optimized for gross sales and conversions.
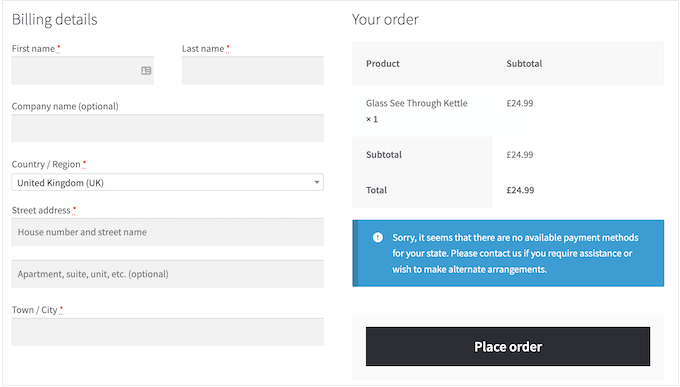
Small edits to the checkout web page may also help you enhance gross sales and scale back cart abandonment in your retailer.
For instance, you’ll be able to present associated merchandise with an ‘Add to Cart’ button on the checkout web page in order that customers might even see one thing else they wish to buy, too.
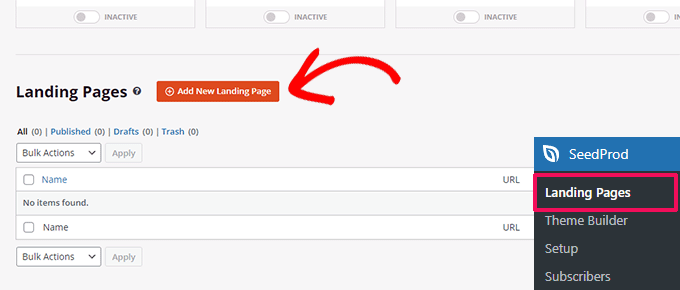
To create your customized checkout web page, merely go to SeedProd » Touchdown Pages and click on on ‘Add New Touchdown Web page’.
Subsequent, you may be requested to decide on a template on your web page.
You possibly can select one of many templates on the display and edit it to create a checkout web page, or you can begin with a clean template.

We can be utilizing the clean template for this tutorial, however you’ll be able to select any of them that you just like.
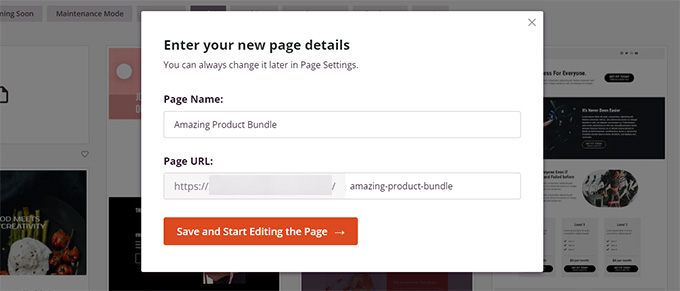
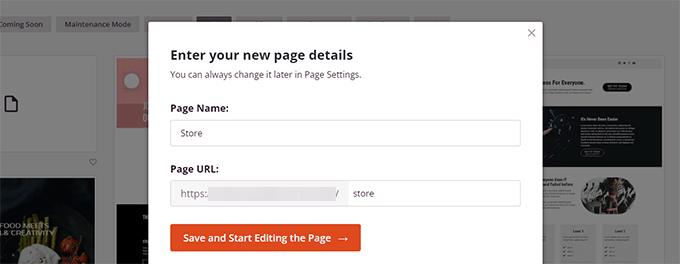
Subsequent, you’ll need to supply a title and URL for the web page. You should utilize something that helps you simply determine this web page.
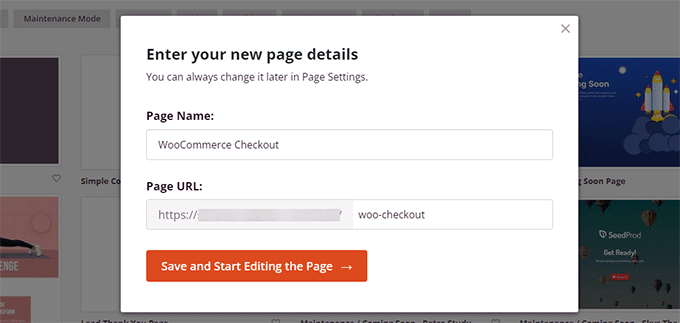
Click on on the ‘Save and Begin Modifying the Web page’ button to proceed.
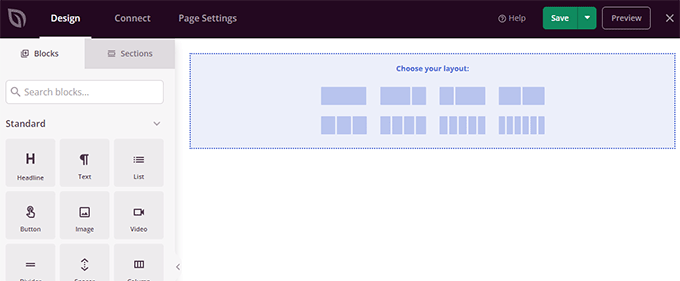
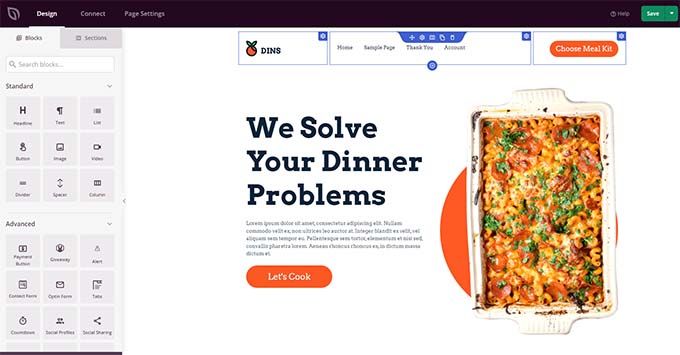
This can launch SeedProd’s web page builder interface, the place you’ll be able to merely drag and drop blocks to construct your web page format.
First, you need to add a header after which customise it with your personal branding.
SeedProd comes with sections, that are collections of blocks which can be typically used collectively. So as to add a header part, click on on the ‘Sections’ tab after which choose the ‘Header’ class.
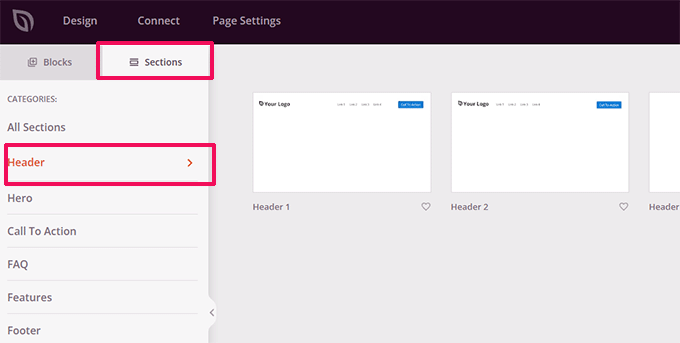
Subsequent, take your mouse to a header and click on the ‘Add (+)’ button to insert it into your web page.
Now you can edit the header part by merely clicking on every block and changing it with your personal brand, menu, and name to motion.
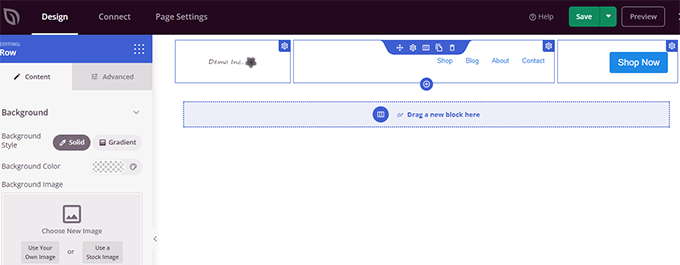
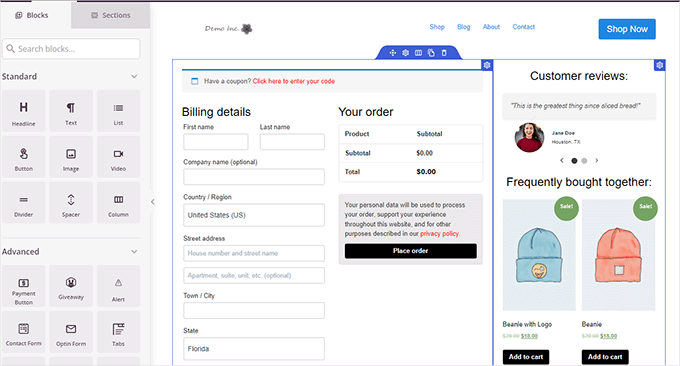
As soon as you might be pleased with the header, it is advisable add a two-column format.
You should utilize this two-column format to show the checkout kind and upsell merchandise, testimonials, and different components.
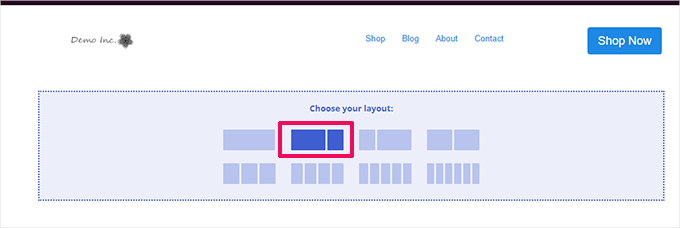
After that, it is advisable add the Checkout block from the left-hand menu.
Add it to the left column, which is wider and can seem first on cell units.
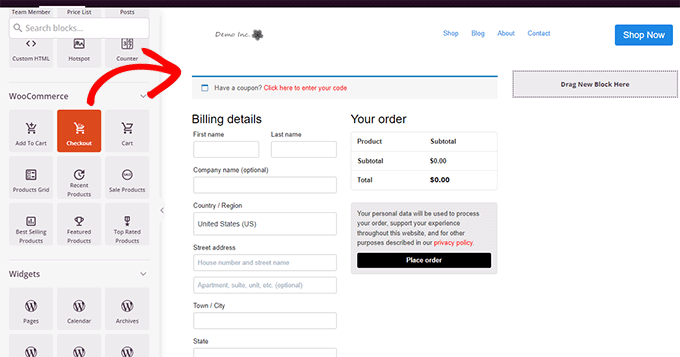
Subsequent, it is advisable add blocks to the appropriate column. That is the realm you should utilize to persuade customers to finish the acquisition.
You possibly can add a testimonial block right here or present your hottest merchandise.
Listed below are a couple of extra issues you’ll be able to add to your checkout web page to enhance it for increased conversions:
Belief badges like safe cost badges offered by PayPal and StripeMore social proof, like real-time buyer activityThe Enterprise Evaluations block in SeedProd to show Google opinions
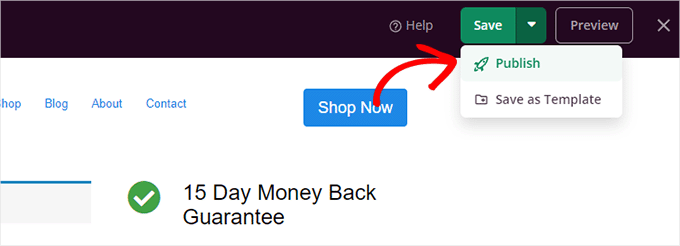
Upon getting completed enhancing your checkout web page, don’t neglect to click on the arrow beside ‘Save’ after which click on on ‘Publish’ within the upper-right nook of the display.
Subsequent, it is advisable inform WooCommerce to begin utilizing your customized checkout web page for all prospects.
Go to the WooCommerce » Settings web page and swap to the ‘Superior’ tab.
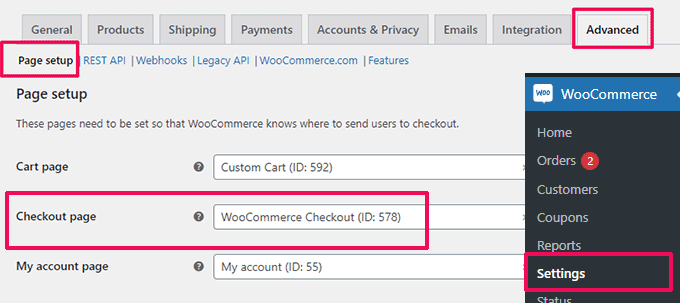
Beneath the ‘Web page Setup’ tab, choose your customized checkout web page for the ‘Checkout web page’ possibility. Don’t neglect to click on on the ‘Save adjustments’ button to retailer your settings.
Now you can go to your retailer in a brand new browser tab and check out the brand new checkout expertise by including a product to your cart.
For extra particulars, you’ll be able to see our tutorial on customizing the WooCommerce checkout web page.
Bonus Tip: Wish to see how your new cart web page is performing? See our tutorial on WordPress conversion monitoring for newbies to trace all of your conversions.
Customise the WooCommerce Checkout Type
The checkout web page is likely one of the areas the place many customers abandon carts.
The best means to make sure customers full their purchases is by providing a greater checkout expertise.
That is the place FunnelKit may also help. It is likely one of the greatest gross sales funnel builders for WooCommerce that allows you to optimize funnels, checkout pages, cart expertise, and extra.
It has dozens of templates, a funnel builder wizard, and drag-and-drop enhancing on your cart and checkout pages.
First, you want to enroll in a FunnelKit plan by visiting their web site.
Be aware: You’ll need at the very least the Plus plan to unlock gross sales funnels, upsells, order bumps, and different options.
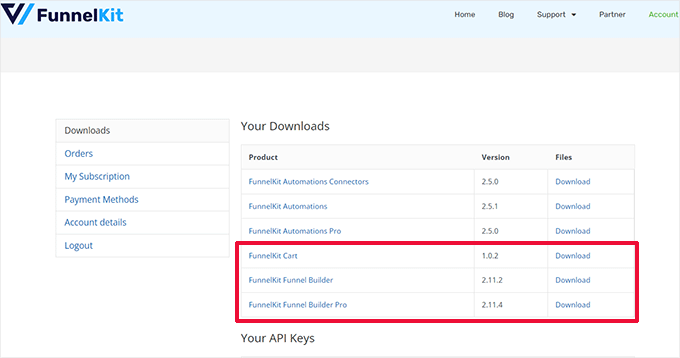
After that, it is advisable set up and activate the FunnelKit Builder and FunnelKit Builder Professional plugins. You will discover them underneath your account on the FunnelKit web site.
Need assistance? See our tutorial on easy methods to set up a WordPress plugin.
Upon activation, you may be requested to supply your plugin license keys. You will discover them on the identical Downloads web page underneath your account on the FunnelKit web site.
Upon getting completed, you might be able to customise the WooCommerce checkout kind.
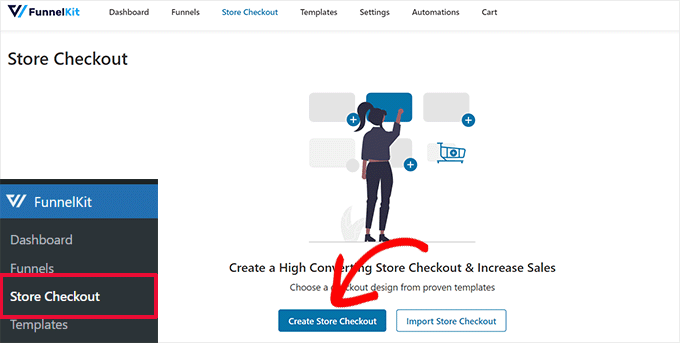
Merely go to the FunnelKit » Retailer Checkout web page within the WordPress admin dashboard and click on on the ‘Create Retailer Checkout’ button.
On the following display, it is advisable first select your editor interface.
FunnelKit templates might be edited with the default Gutenberg editor, Elementor, Divi, Oxygen, or every other web page builder by utilizing shortcodes.
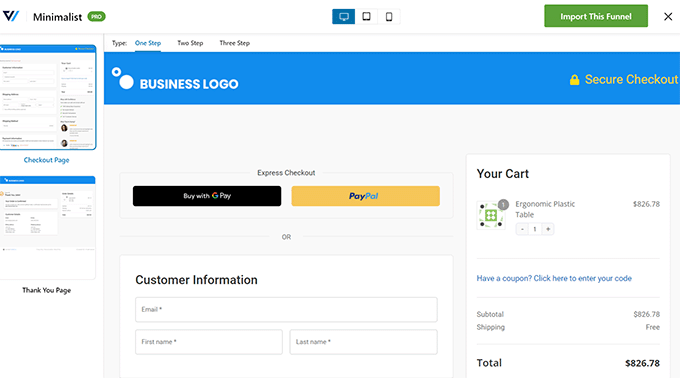
After that, it is advisable select a template. There are dozens of lovely templates to select from. Simply click on on the ‘Preview’ button to see a stay preview of the template.
You possibly can select between a single-step or multi-step checkout web page within the preview. After that, merely click on on the ‘Import This Funnel’ button on the high.
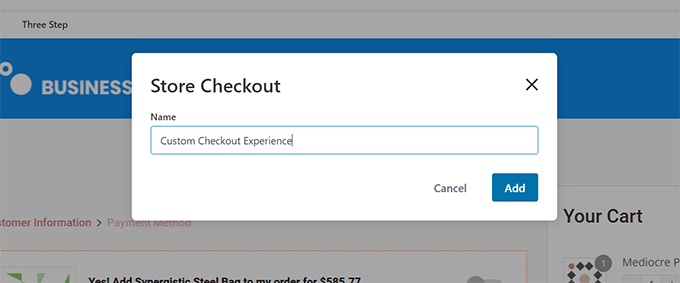
Subsequent, you may be requested to enter a reputation on your funnel.
You possibly can name it something that helps you determine it later. Then, click on on the ‘OK’ button to proceed.
FunnelKit will now create your customized checkout web page.
After that, you will notice the web page dashboard. From right here, you’ll be able to edit your checkout web page, add extra steps, or add an order bump.
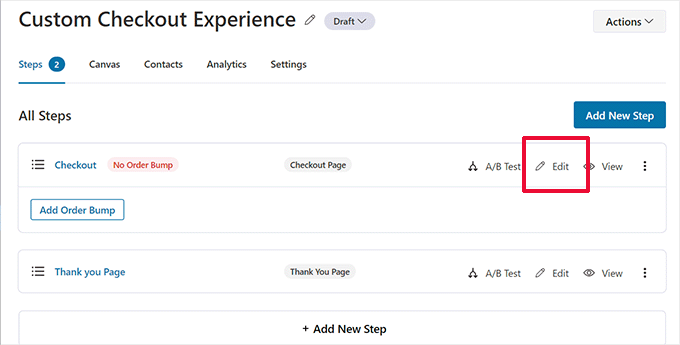
Modifying a web page will open it within the editor you selected earlier.
For this tutorial, we selected Gutenberg. Every merchandise on the checkout web page is a block that you may edit by merely clicking to pick it.
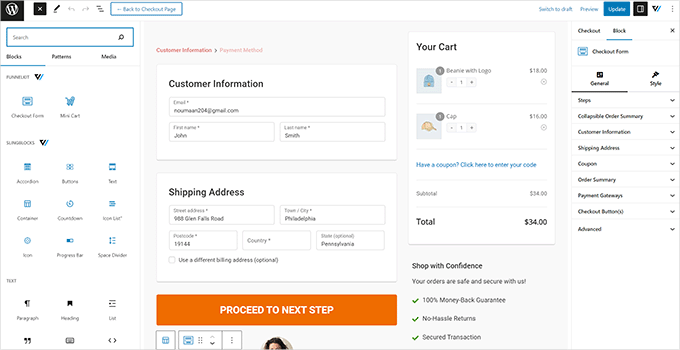
You may also add new blocks by clicking on the ‘Add Block’ button.
Upon getting completed making the adjustments, don’t neglect to click on on the ‘Replace’ button.
This can deliver you again to the Checkout web page dashboard. From right here, it is advisable swap to the ‘Fields’ tab.
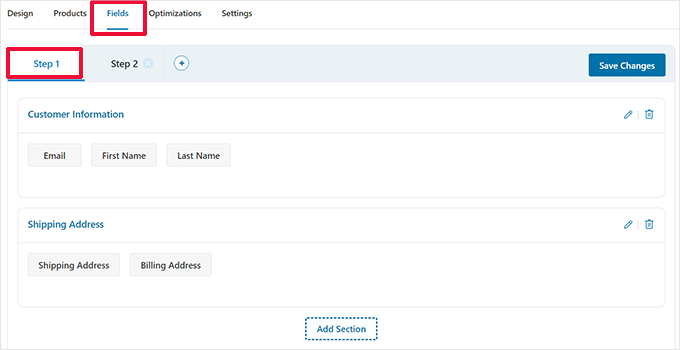
That is the place you’ll be able to edit the checkout kind fields. On this instance, we’re utilizing a two-step checkout kind. This lets you seize the contact info earlier than the cost.
You may also add new kind fields from the appropriate column. By default, the plugin reveals the generally used checkout fields.
Nonetheless, you’ll be able to click on on the ‘Add New Discipline’ button so as to add a customized kind subject.
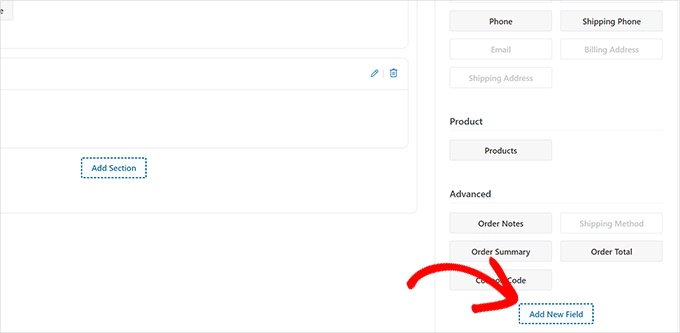
This can present a popup the place you’ll be able to select the sector sort, present a meta key, and enter a label.
You may also make the sector ‘required’ and assign it to the checkout or thanks web page.
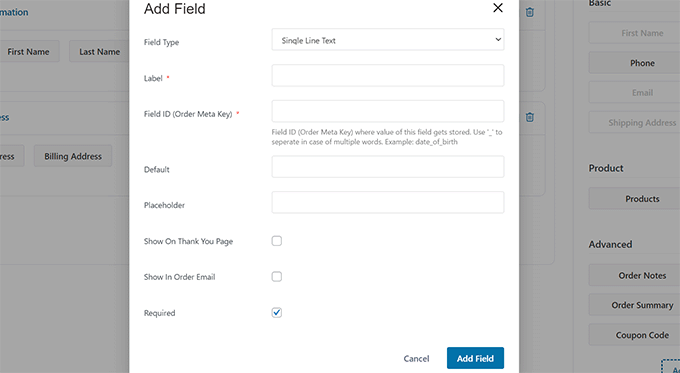
Don’t neglect to click on on the ‘Save Modifications’ button to retailer your kind settings.
FunnelKit comes with a bunch of optimizations that you may add to your checkout web page for a extra frictionless expertise.
Simply swap to the ‘Optimizations’ web page, and you will notice a listing of optimizations that you may apply to the checkout web page.

Merely click on on an optimization to configure it, then click on on the ‘Save Modifications’ button to retailer your adjustments.
Subsequent, swap to the ‘Settings’ tab to allow Analytics, Fb pixel, customized scripts, or CSS in your checkout funnel.
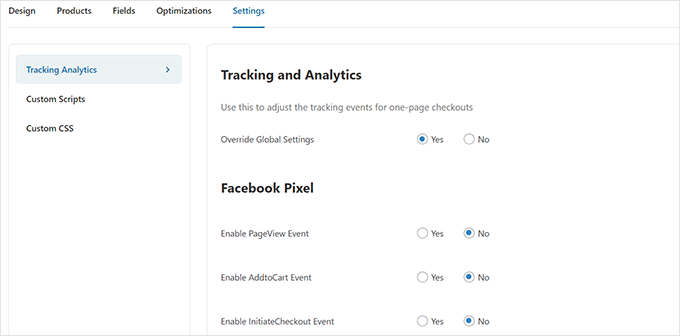
Don’t neglect to click on on the ‘Save Modifications’ button to use your adjustments.
Lastly, it is advisable click on on the ‘Draft’ button subsequent to the Checkout web page title and alter it to ‘Publish’. This can exchange your current checkout web page with the customized funnel you might have simply created.
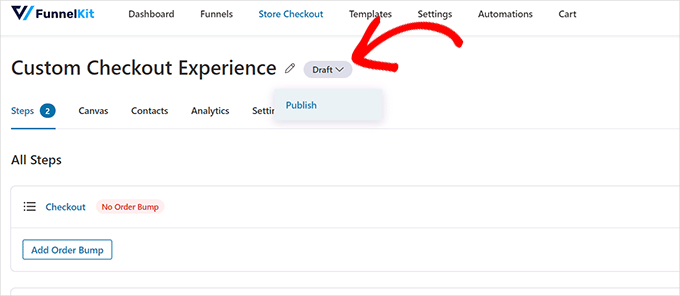
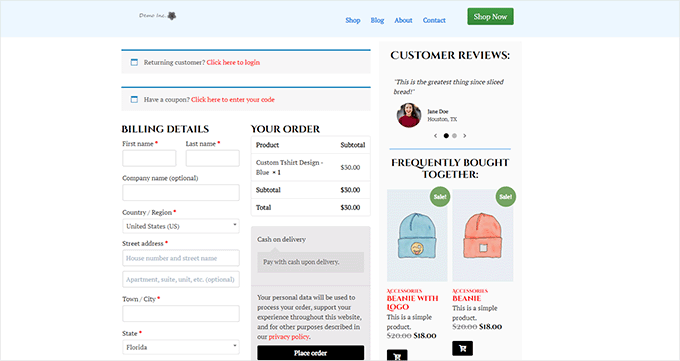
Now you can go to your retailer in a brand new browser tab to check the customized checkout expertise you might have created.
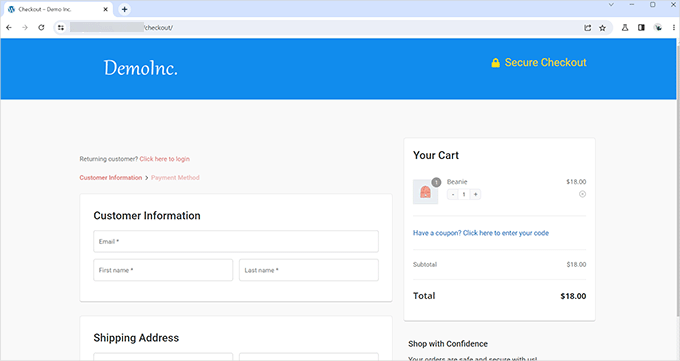
That is the way it regarded on our demo web site.
Add One-Web page Checkout in WooCommerce
FunnelKit additionally lets you create a one-page checkout expertise.
It’s good to go to the FunnelKit » Retailer Checkout web page and click on on ‘Create Retailer Checkout’.
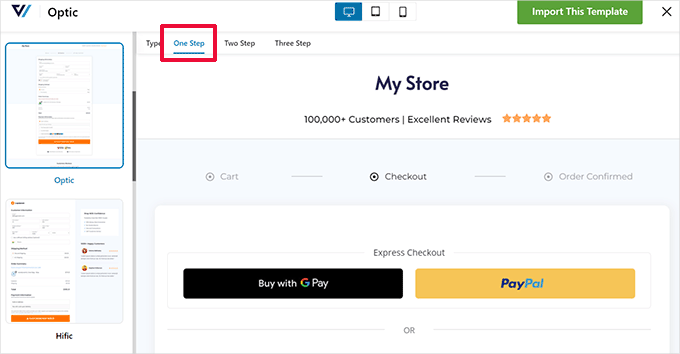
Within the template choice, merely click on on the ‘One-Step’ possibility on the high.
After that, click on on the ‘Import This Funnel’ button to proceed.
You possibly can then proceed enhancing your template in your most popular editor. See the earlier part of this tutorial for extra detailed directions.
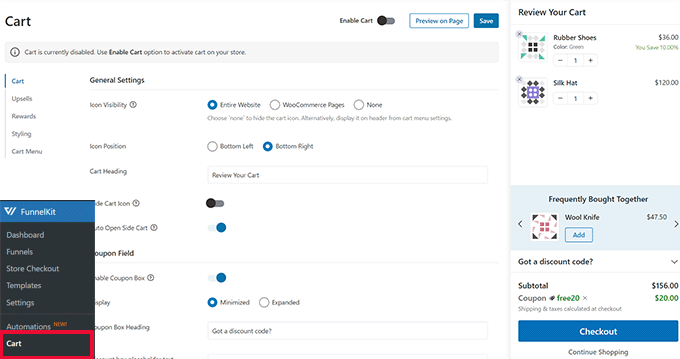
Add a Slide-In Cart to WooCommerce
Most WooCommerce themes include a separate cart web page. This cart expertise provides friction to the procuring and checkout experiences.
If customers want to regulate the product high quality or take away objects from the cart, they’ve to go away the web page they’re at present viewing to replace the cart.
This may be fastened by including a slide-in cart in WooCommerce.
A slide-in cart reveals a cart button on the display. Clicking on the button shows a slide-in menu with merchandise the person has added to the cart.
Customers can now edit and replace the cart with out leaving the web page.
FunnelKit has a wonderful slide-in cart characteristic that integrates seamlessly together with your on-line retailer. You possibly can even use it to upsell merchandise, incentivize checkout, supply reductions, and extra.
First, it is advisable go to the FunnelKit web site and join an account.
Be aware: You’ll need at the very least the Plus plan to entry the slide-in cart options.
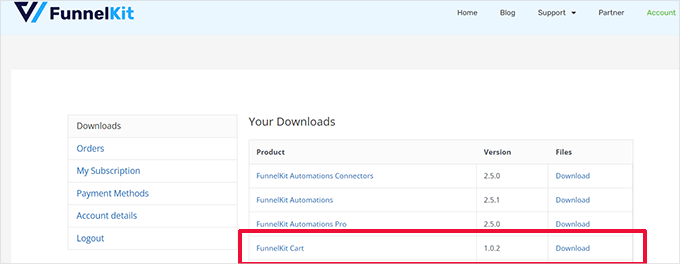
After signup, go to your account on the FunnelKit web site to obtain the FunnelKit Cart plugin.
Subsequent, it is advisable set up and activate the plugin. For extra particulars, see our tutorial on easy methods to set up a WordPress plugin.
Upon getting activated the plugin, you will need to go to the FunnelKit » Cart web page to configure the slide-in cart settings.
From right here, you will notice many choices to your left and a stay preview of how your slide-in cart will look.
FunnelKit provides a ton of customization choices. As an example, you’ll be able to select from totally different kinds, choose cart icons, change button textual content, and extra.
You may also add upsell merchandise or cross-sell merchandise, supply reductions, and make the cart expertise way more interesting.
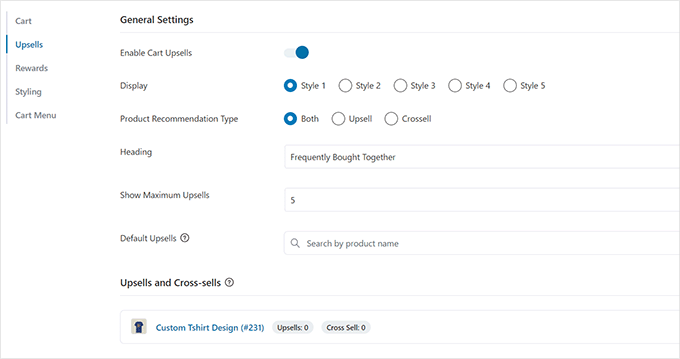
To publish your adjustments, don’t neglect to click on on the ‘Save’ button.
Now you can go to your web site to check the slide-in cart in your stay retailer.
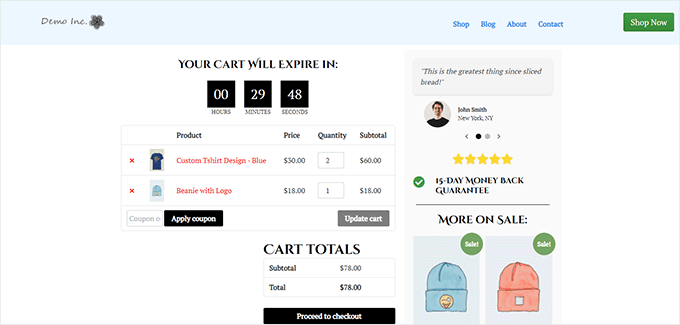
Customise the WooCommerce Cart Web page
WooCommerce has a default cart web page permitting customers to proceed to the checkout web page.
By default, it reveals the merchandise prospects have added to their cart. Nonetheless, analysis reveals that greater than 70% of consumers depart a web-based retailer with out finishing the acquisition.
WooCommerce themes typically include a boring cart web page with no optimization for conversions.
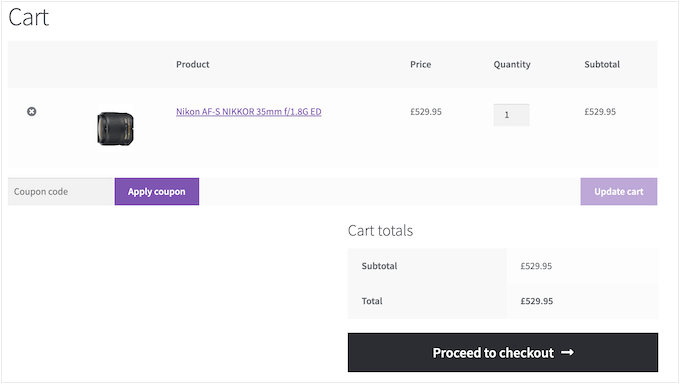
By customizing your WooCommerce cart web page, you’ll be able to simply scale back cart abandonment and enhance gross sales.
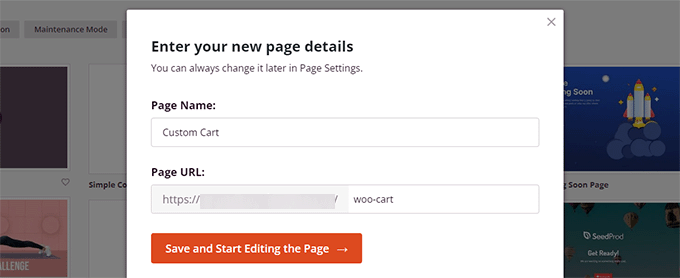
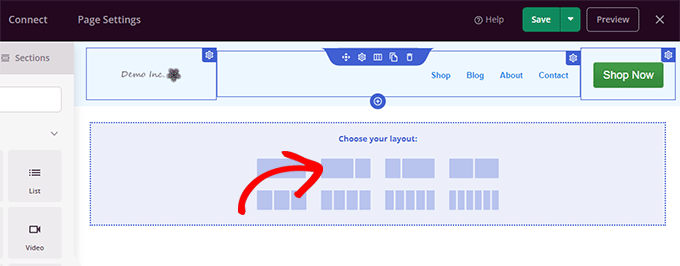
To create your customized checkout web page, merely go to the SeedProd » Touchdown Pages and click on on ‘Add New Touchdown Web page’.
Subsequent, you may be requested to decide on a template on your web page.
You possibly can select one of many templates on the display and edit it to create a cart web page, or you can begin with a clean template.
We’ll use the clean template for this tutorial.
Subsequent, you’ll need to supply a title and URL for the web page. You should utilize something that helps you simply determine this web page.
This can launch the SeedProd builder interface.
You can begin by switching to the ‘Sections’ tab and including a header to your clean template.
After that, be happy to level and click on to edit the header space to your liking.
Under that, it is advisable add a two-column format, which you’ll use so as to add different cart web page blocks.
Subsequent, add the ‘Cart’ block to the appropriate column.
Now, since your cart is at present empty, it won’t present any merchandise. Go to your retailer and add a couple of merchandise to your cart after which reload the SeedProd web page builder.
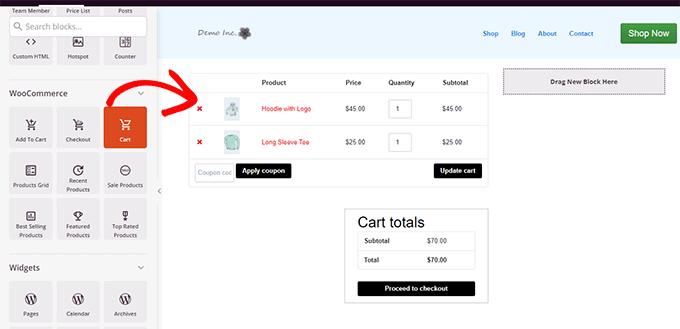
After that, you’ll be able to add different components to enhance your cart web page.
As an example, you can begin by including testimonials or add a countdown timer to set off the FOMO impact.
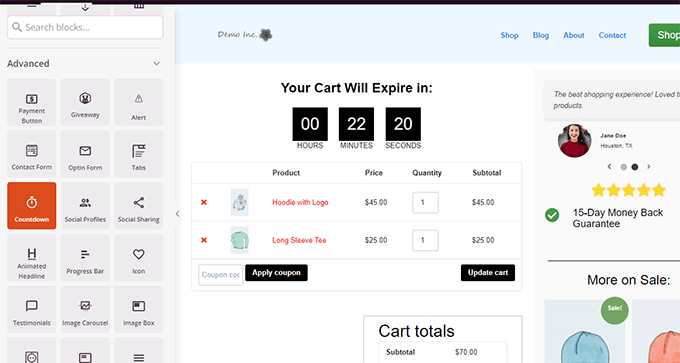
Be happy to mess around by including totally different blocks and tweaking colours and width.
Upon getting completed enhancing, don’t neglect to click on on ‘Save and Publish’ within the top-right of the display.
Subsequent, it is advisable inform WooCommerce to begin utilizing your customized cart web page for all prospects.
Go to the WooCommerce » Settings web page and swap to the ‘Superior’ tab.
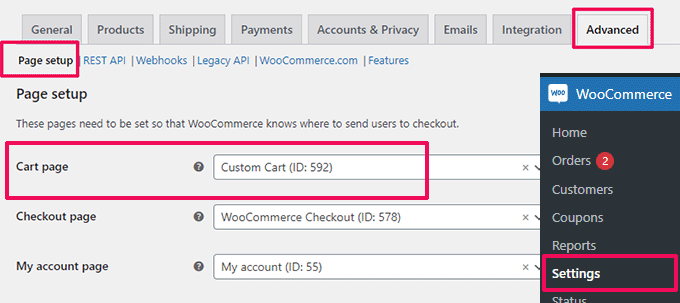
Now you can go to your on-line retailer in a brand new browser tab.
Begin including a couple of merchandise, after which head over to the cart web page to see your new cart web page in motion.
Edit WooCommerce Product Pages
WooCommerce themes use the identical template to show all merchandise in your web site.
Nonetheless, chances are you’ll wish to promote some merchandise greater than others. Essentially the most you are able to do to tell apart vital merchandise is to make them featured merchandise.
SeedProd lets you create customized product pages. You should utilize a well-designed template tailored for increased conversions after which merely fill it together with your product info.
To get began, merely go to the SeedProd » Touchdown Pages after which click on on ‘Add New Touchdown Web page’.
Subsequent, you may be requested to decide on a template on your web page.
You possibly can select one of many templates on the display and edit it to create a product web page. You will see that a number of templated optimized for conversions underneath the ‘Gross sales’ tab.
Merely click on to pick a template and proceed.
Subsequent, you may be requested to supply a web page title and URL. You should utilize the product identify because the title and URL.
Click on on the ‘Save and Begin Modifying the Web page’ button to proceed.
This can launch the SeedProd web page builder interface together with your chosen template. You possibly can merely level and click on on any merchandise on the web page to edit it.
You can begin by changing the header objects, equivalent to the emblem, navigation menu, and call-to-action button, with your personal.
After that, you’ll be able to exchange pictures together with your product pictures and edit the textual content as needed.
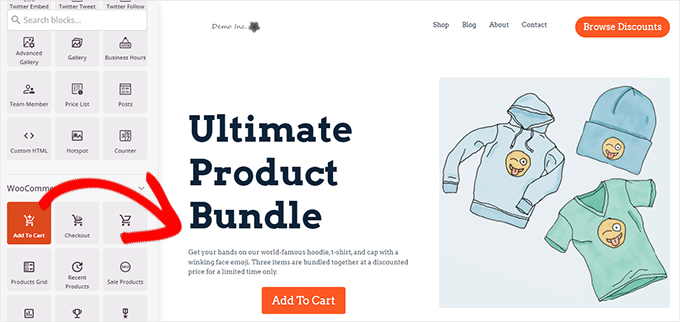
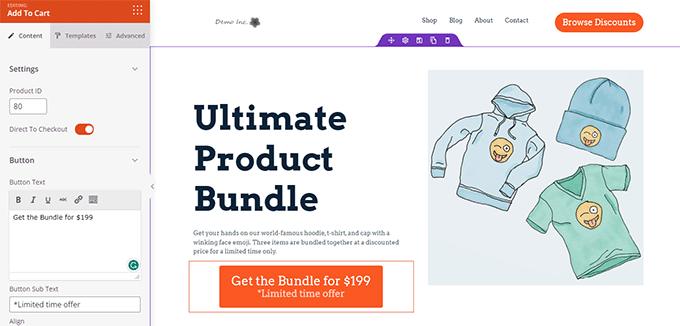
Lastly, you’ll be able to exchange the decision to motion with the Add to Cart block.
After that, it is advisable enter the product ID within the Add to Cart block settings. You may also change the button textual content, in addition to add subtext, shade, and shift alignment.
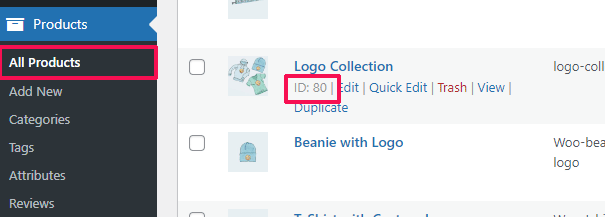
To discover a product ID, it is advisable go to the Merchandise » All Merchandise web page within the WordPress admin space in a separate browser tab.
Take the mouse over to the product that you just wish to promote, and the product ID will seem together with different hyperlinks.
To make your product web page simpler, you’ll be able to strive the following pointers:
Add high-quality product pictures with the zoom impact in order that customers can clearly study the product. Beneath your essential name to motion, you’ll be able to create totally different rows highlighting product options and offering extra info to the shoppers. Use social proof to set off the FOMO impact.
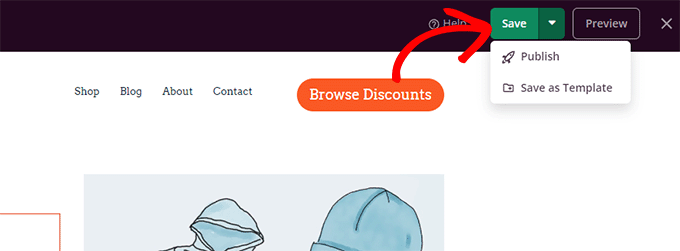
As soon as you might be carried out enhancing your product web page, don’t neglect to click on on the ‘Save and Publish’ button on the high.
As soon as revealed, you’ll be able to view your product web page by clicking on the ‘Preview’ button.
This can present the stay product web page in your web site that you may now begin selling.

For extra particulars and bonus suggestions, see our tutorial on customizing WooCommerce product pages.
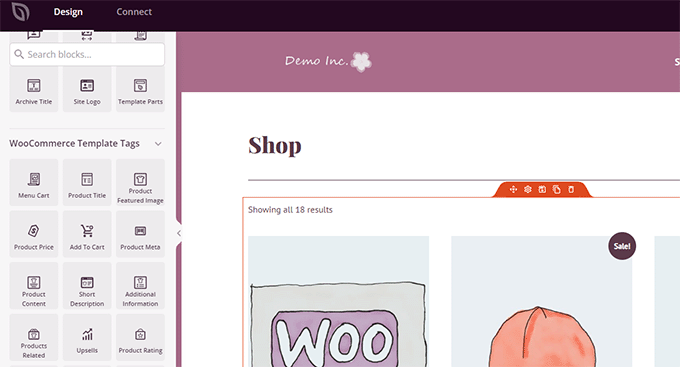
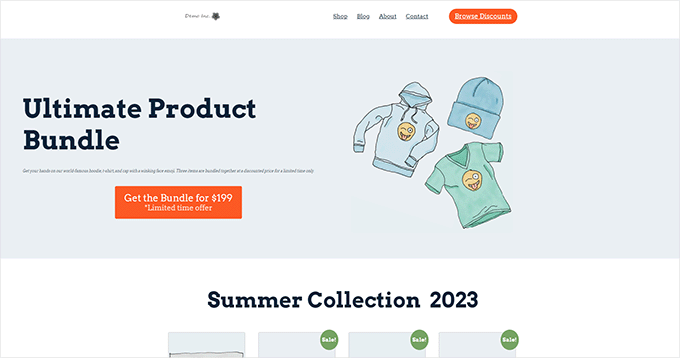
Customise the Store Web page for Your WooCommerce Retailer
WooCommerce lets you simply show your merchandise on the store web page. It’s mainly a web page together with your merchandise displayed in a grid format.
The store template in most WooCommerce themes is boring and never optimized for gross sales and conversions. On high of that, there are often no or only a few choices to customise it.
SeedProd lets you create and customise a WooCommerce store web page simply. You possibly can select your personal format and design and optimize this web page for increased conversions.
To get began, merely go to the SeedProd » Touchdown Pages after which click on on the ‘Add New Touchdown Web page’ button.
Subsequent, you may be requested to decide on a template on your web page.
You possibly can select one of many templates on the display and edit it to create your store web page.
Merely click on to pick a template and proceed.
Subsequent, you may be requested to supply a web page title and URL. You should utilize one thing like Store, Retailer, or Storefront to point that it’s the essential store web page.
Click on on the ‘Save and Begin Modifying the Web page’ button to proceed.
This can launch the SeedProd web page builder interface together with your chosen template. You possibly can merely level and click on on any merchandise on the web page to edit it.
You can begin by changing the header objects, equivalent to the emblem, navigation menu, and call-to-action button, with your personal.
After that, you’ll be able to add a hero part on the high with a big picture and your essential name to motion.
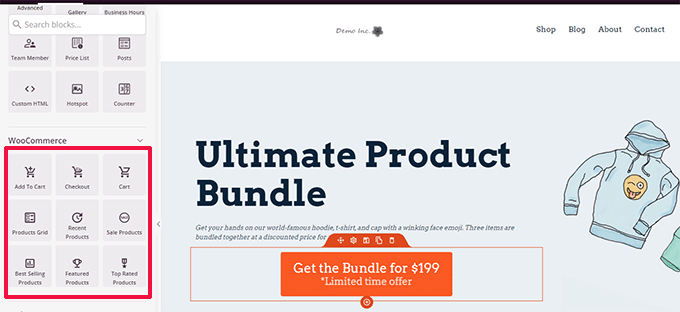
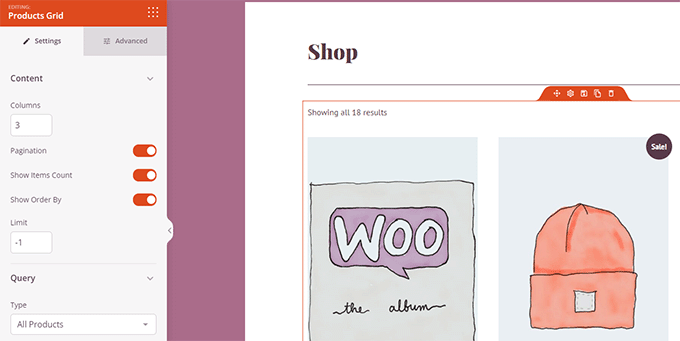
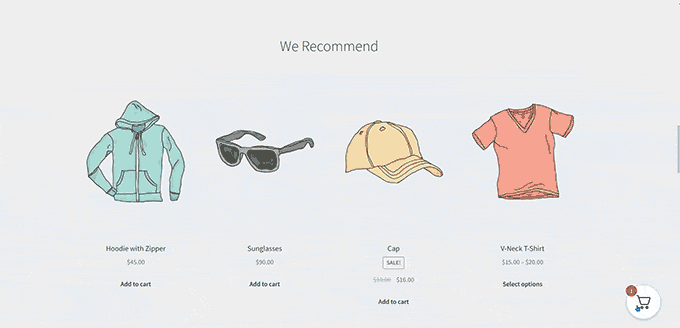
Under that, you should utilize WooCommerce blocks to show your merchandise.
You possibly can select from current, featured, best-selling, top-rated, and sale merchandise.
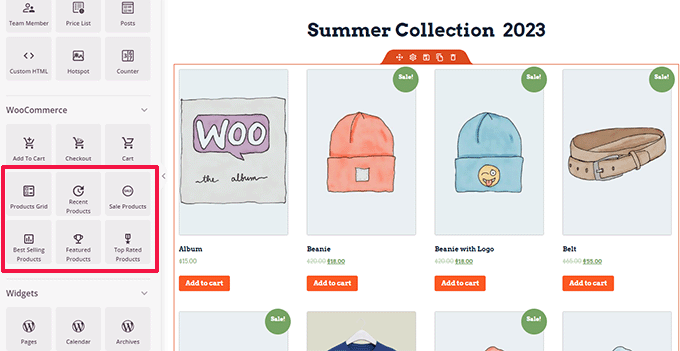
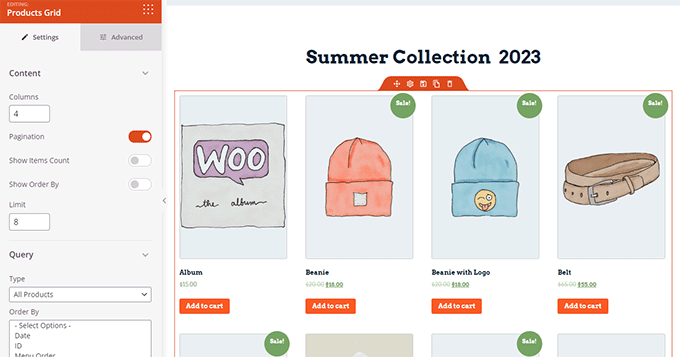
After including a product block, you may also customise the way it seems.
SeedProd lets you select the variety of merchandise, sorting choices, columns, and extra.
You possibly can additional optimize this web page by including extra textual content, particular provides, banners, an FAQ part, and extra.
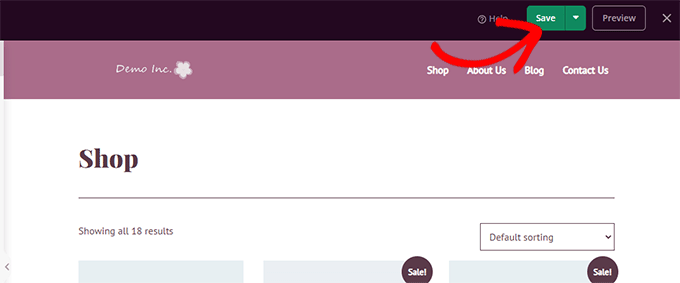
As soon as you might be carried out enhancing, don’t neglect to click on on ‘Save and Publish’ on the high.
After saving your web page, click on the ‘Preview’ button to see it in motion.
SeedProd will open the web page in a brand new browser tab.
Now you can exchange hyperlinks to the Store web page in your navigation menu together with your customized store web page.
Customise WooCommerce Thank You Web page
The WooCommerce ‘Thank You’ web page seems when a buyer completes a purchase order. By default, WooCommerce will solely present them their order particulars on this web page.
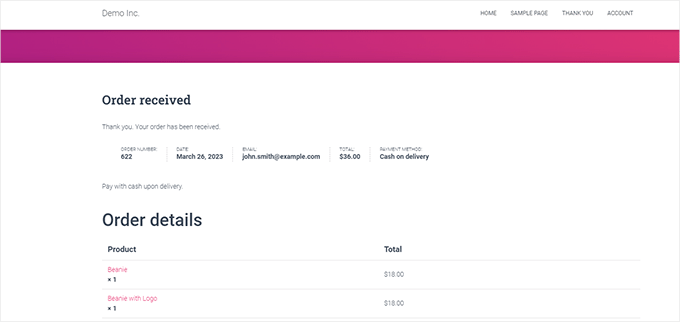
That doesn’t present prospects with extra choices to discover. It’s form of a useless finish and a missed alternative for gross sales and conversions.
Fortunately, you’ll be able to repair that with SeedProd by making a customized thanks web page.
To get began, merely go to the SeedProd » Touchdown Pages after which click on on the ‘Add New Touchdown Web page’ button.
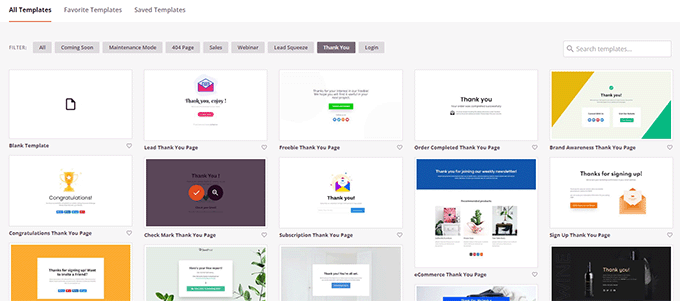
Subsequent, you may be requested to decide on a template on your web page.
Swap to the ‘Thank You’ tab, and one can find a bunch of thanks web page templates. You possibly can select one in all them, or you’ll be able to even begin with a clean template.
Subsequent, you may be requested to decide on a title and URL on your web page.
You should utilize ‘Thank You’ or every other significant title on your web page.
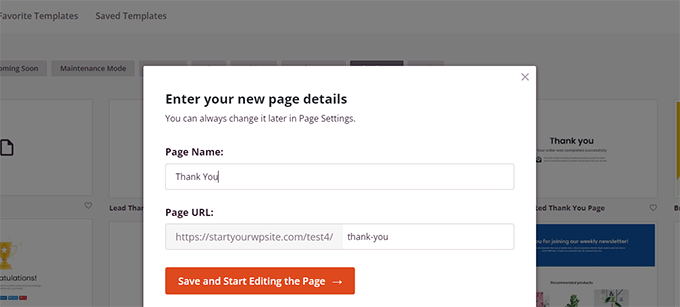
Click on on the ‘Save and Begin Modifying the Web page’ button to proceed.
This can launch the SeedProd web page builder interface, the place you will notice a stay preview of your template. You possibly can merely level and click on to edit any merchandise within the preview or add new blocks from the left column.
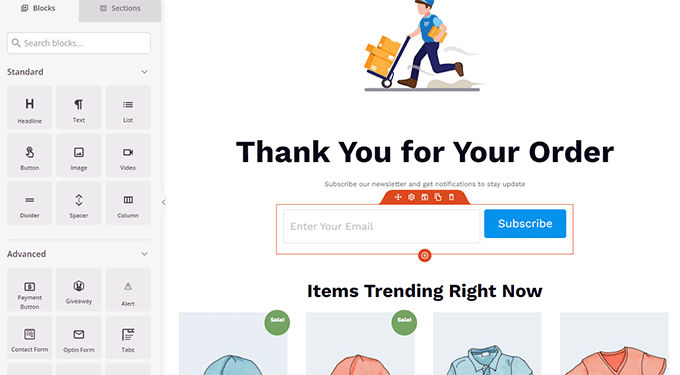
Now you can use this chance to advertise your electronic mail listing or upsell merchandise by including WooCommerce product grid blocks.
Be happy to experiment with totally different headings, textual content copy, and merchandise to create an efficient Thank You web page.
As soon as completed, don’t neglect to click on on the ‘Save and Publish’ button within the high proper nook of the display.
Your customized thanks web page is now stay. Nonetheless, you continue to want to inform WooCommerce to make use of this web page as your default Thank You web page.
To do this, you’ll need to put in and activate the Thanks Redirect for WooCommerce plugin. For extra particulars, see our tutorial on easy methods to set up a WordPress plugin.
Upon activation, go to the WooCommerce » Settings web page and click on the ‘Merchandise’ tab.
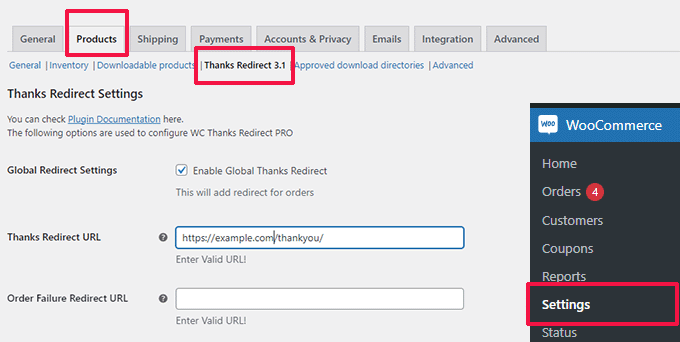
From right here, it is advisable test the ‘Allow International Thanks Redirect’ possibility. After that, you will notice a subject labeled ‘Thanks Redirect URL.’
Paste your new WooCommerce Thank You web page URL into this field, then click on the ‘Save Modifications’ button.
Now when prospects full a purchase order, they’ll see your extremely optimized customized Thank You web page. They are going to be way more prone to click on and search the remainder of your retailer than should you had stayed with the default.
We hope this text helped you learn to simply edit WooCommerce pages with out writing code. You may additionally wish to see our full WooCommerce website positioning information or our knowledgeable picks for the most effective WooCommerce gross sales funnel plugins to spice up your conversions.
For those who preferred this text, then please subscribe to our YouTube Channel for WordPress video tutorials. You may also discover us on Twitter and Fb.
The put up Learn how to Edit WooCommerce Pages (No Coding Required) first appeared on WPBeginner.

