

Are you trying to set up Google Tag Supervisor in WordPress?
Google Tag Supervisor permits you to add monitoring code snippets to your WordPress web site. It’s a free software and means that you can monitor completely different consumer interactions.
On this article, we are going to present you tips on how to correctly set up and arrange Google Tag Supervisor in WordPress and clarify the advantages.
What’s Google Tag Supervisor?
Google Tag Supervisor (GTM) is a free software by Google that allows you to add, replace, and handle code snippets referred to as tags in your WordPress web site.
Typically web site homeowners want so as to add a number of code snippets to trace their conversions, type submissions, hyperlink clicks, and collect different analytical knowledge on their web site. With Google Tag Supervisor, you possibly can simply add and handle all of those scripts from a single dashboard.
There are built-in tag templates for Google Analytics, Google Advertisements, Google Optimize, DoubleClick, and Google AdSense. The Tag Supervisor additionally works with a number of third-party analytics and monitoring platforms.
This protects you the time of including and eradicating tags out of your code quite than managing it from a straightforward dashboard. To not point out, all of those separate snippets get loaded in a single script.
That mentioned, let’s see tips on how to add Google Tag Supervisor to WordPress. We can even present you an alternate methodology for monitoring completely different consumer interactions in your web site. The most effective half, you don’t need to edit code or arrange tags.
Merely click on the hyperlinks beneath to leap forward to your most well-liked part:
Including Google Tag Supervisor in WordPress
First, you’ll want to go to the Google Tag Supervisor web site and click on the ‘Begin at no cost’ button to enroll.

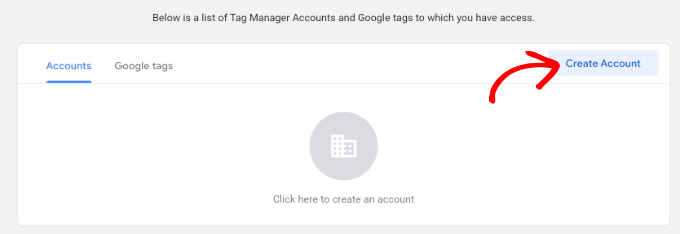
After login, you’ll come to the add new account web page.
Go forward and click on the ‘Create Account’ button.
Subsequent, you possibly can enter a reputation to your account and choose a Nation from the dropdown menu.
Tag Supervisor can even provide the choice to share knowledge anonymously with Google. You may merely click on the checkbox and scroll down.

Now it’s good to add a container to your account. A container may very well be an internet site, iOS or Android apps, or a server. On this case, we are going to use the ‘Internet’ possibility.
You should utilize your web site’s area for the container title. When you’re achieved, click on on the ‘Create’ button to proceed.

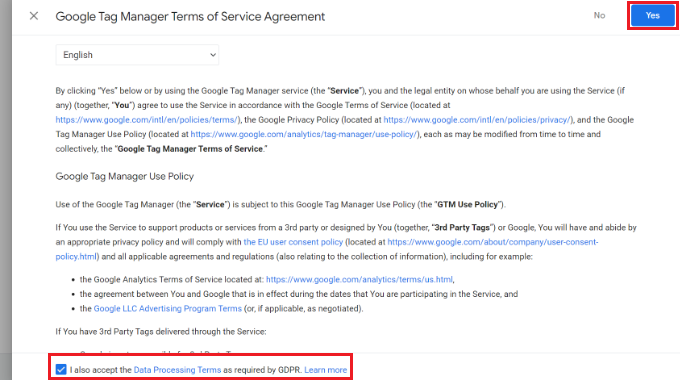
You’ll now see a brand new window slide in from the proper with the Google Tag Supervisor phrases of service settlement.
You may click on the checkbox on the backside to just accept the information processing phrases after which click on the ‘Sure’ button on the high.
Google Tag Supervisor will now create your account.
Subsequent, it can now present you monitoring codes that it’s good to add to your web site.
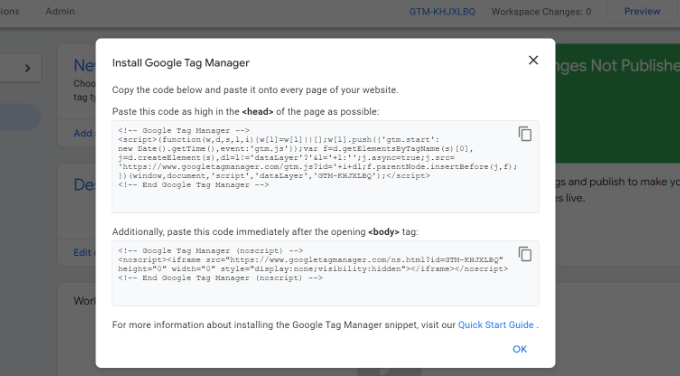
Merely copy these 2 codes, as you will have so as to add them to the header and physique part in your WordPress web site.
Including Google Tag Supervisor Code to WordPress
The best means of including code snippets in WordPress is utilizing the WPCode plugin. It’s the greatest WordPress code snippet plugin and allows you to add and handle completely different customized codes in your web site.
The most effective half, you may get began at no cost with the WPCode. Nevertheless, there’s additionally a premium model that gives extra options like a code snippet library, conditional logic, auto-insert snippets, and extra.
First, you’ll want to put in and activate the free WPCode plugin. In case you need assistance, then please see our information on tips on how to set up a WordPress plugin.
Upon activation, it’s good to go to the Code Snippets » Headers & Footers web page from the WordPress admin panel. Now enter the codes you copied earlier.
Be certain that you paste the <head> code within the Header discipline and the <physique> code within the Physique discipline, as you possibly can see beneath.
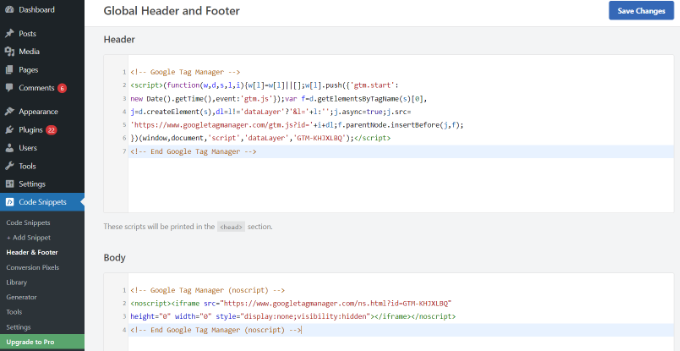
When you’re achieved, don’t neglect to click on the ‘Save Adjustments’ button.
Google Tag Supervisor is now prepared to make use of in your WordPress web site.
Making a New Tag in Google Tag Supervisor
Subsequent, you possibly can create a brand new tag in Google Tag Supervisor and arrange monitoring in your WordPress web site.
Let’s say you need to add Google Analytics 4 (GA4) to your WordPress web site utilizing Tag Supervisor.
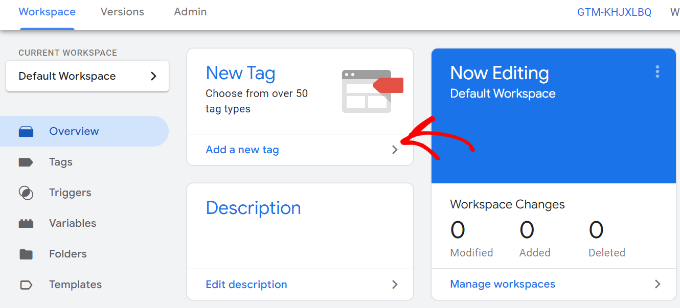
First, you’ll have to click on on the ‘Add a brand new tag’ possibility out of your Tag Supervisor dashboard.
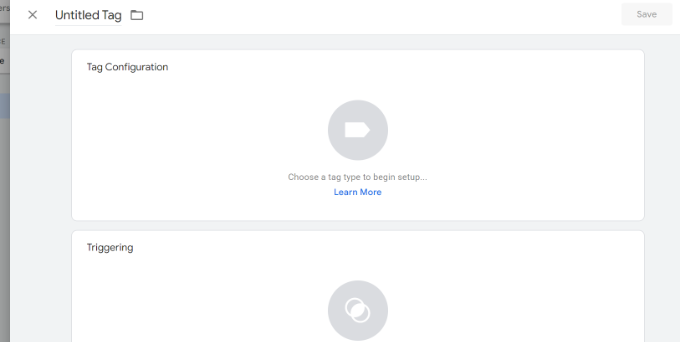
After that, you possibly can enter a reputation to your tag on the high.
From right here, merely click on on the ‘Tag configuration’ possibility.
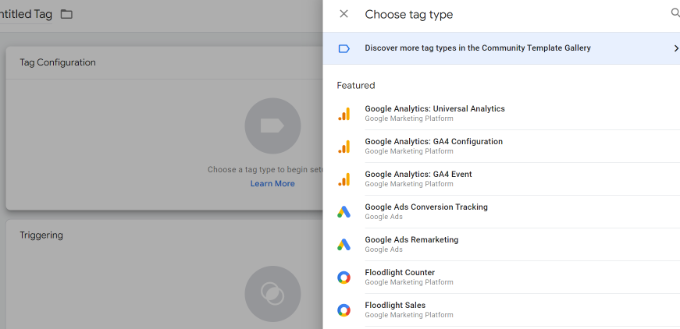
Subsequent, Tag Supervisor will present you completely different tag varieties to select from.
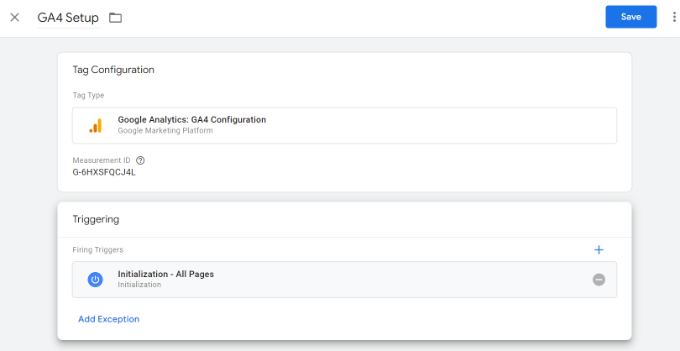
As an example, this may embrace tags for Google Analytics, Google Advertisements, Floodlight, and extra. We’ll choose ‘Google Analytics: GA4 Configuration’ for this tutorial.
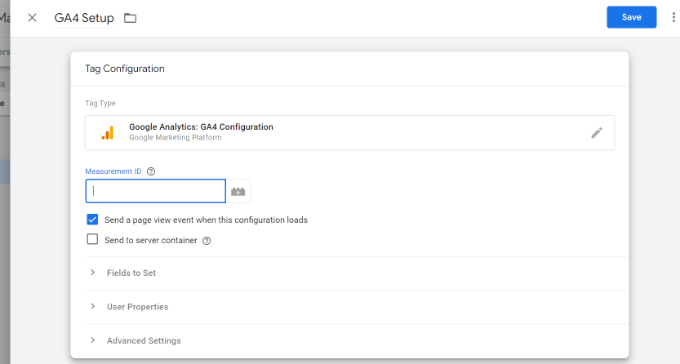
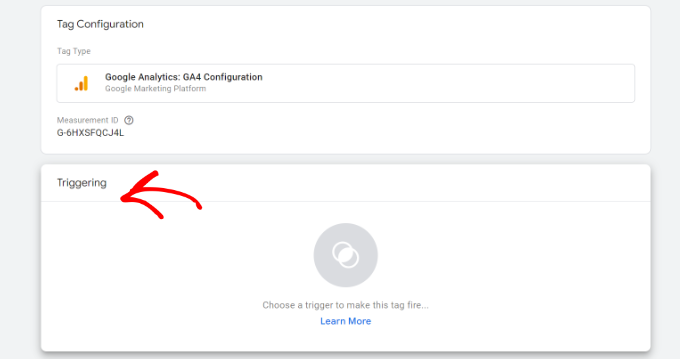
Subsequent, you will have to enter the small print of your tag.
First, you possibly can add the Measurement ID.
You will discover the Measurement ID by logging into your Google Analytics account.
Merely head to the Admin » Knowledge Streams possibility underneath the Property column. Go forward and click on in your Knowledge Streams to view the measurement ID.
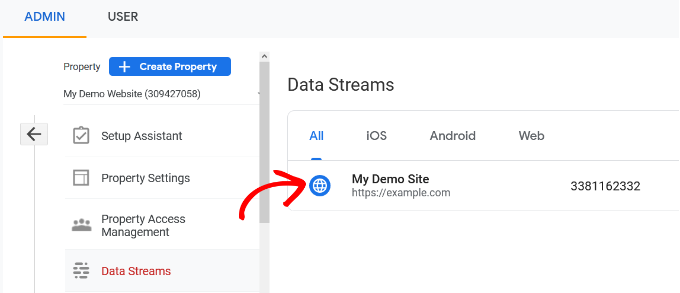
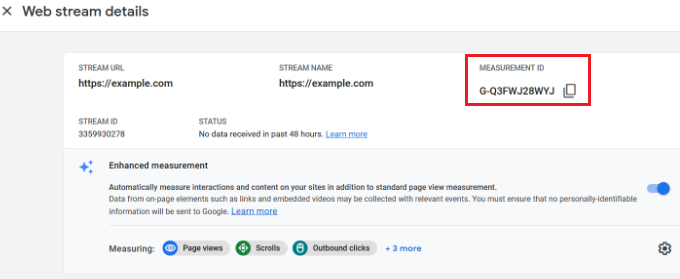
When a brand new window opens, you need to see the Measurement ID within the high proper nook.
You may merely copy the ID.
Now head again to the Google Tag Supervisor window or tab, and enter the measurement ID.
After that, you possibly can scroll down and click on on the ‘Triggering’ possibility.
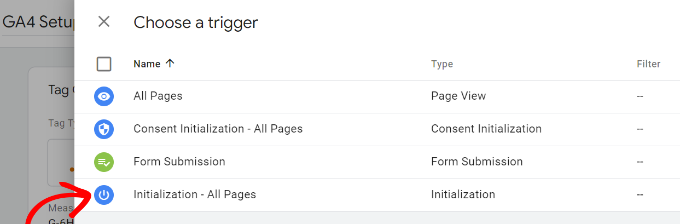
Google Tag Supervisor will now present built-in triggers to select from.
Go forward and choose the ‘Initialization – All Pages’ possibility.
After deciding on the set off, you will have to retailer your settings.
Merely click on the ‘Save’ button within the high proper nook.
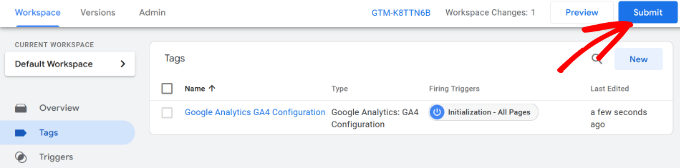
You need to now see your newly created tag.
Go forward and click on the ‘Submit’ button to run the tag.
Set Up Superior Monitoring Utilizing MonsterInsights (Simple Method)
Now that you understand how to put in and use Google Tag Supervisor, you need to use a neater means of organising superior monitoring in your WordPress web site.
With MonsterInsights, you don’t need to carry out sophisticated setups in GTM. It’s the greatest Google Analytics plugin for WordPress and mechanically configures superior monitoring for you. You additionally don’t have to fret about making a mistake that would mess up your monitoring knowledge.
The most effective half, MonsterInsights exhibits studies inside your WordPress dashboard. You received’t have to go away your web site to see its efficiency. It presents knowledge that issues for your small business and helps uncover insights.
For this tutorial, we are going to use the MonsterInsights Professional model as a result of it contains superior monitoring options and premium addons. There’s additionally a MonsterInsights Lite model you need to use to get began at no cost.
First, you’ll want to put in and activate the MonsterInsights plugin. In case you need assistance, then please see our information on tips on how to set up a WordPress plugin.
Upon activation, you will notice the MonsterInsights welcome display screen. You may click on the ‘Launch the Wizard’ button and comply with the onscreen steps to configure Google Analytics.

For extra particulars, please see our information on tips on how to set up Google Analytics in WordPress.
MonsterInsights will work out of the field and mechanically add monitoring in Google Analytics.
Listed here are among the monitoring options the plugin gives:
1. Monitor Hyperlink and Button Clicks
MonsterInsights units up hyperlink click on and button click on monitoring out of the field in your web site. Google Analytics doesn’t monitor hyperlink clicks by default, and also you’d have to make use of GTM so as to add monitoring.
As an example, you possibly can monitor affiliate efficiency and see which hyperlinks customers click on essentially the most. This manner, you possibly can develop your income by selling associates which might be getting lots of clicks.
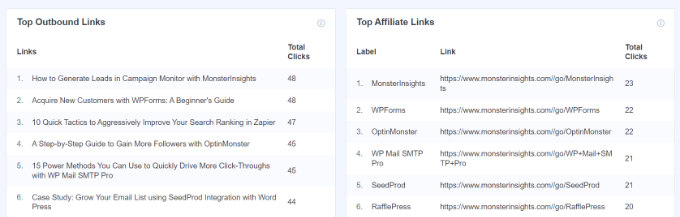
Equally, the plugin additionally tracks outbound hyperlink clicks. These are hyperlinks to different web sites in your web site. You should utilize this knowledge to see create new partnerships, signup for an associates program, and create new content material by yourself web site.
Apart from that, MonsterInsights additionally helps monitor phone hyperlinks, file downloads, call-to-action (CTA) button clicks, and extra.
2. Set Up eCommerce Monitoring in WordPress
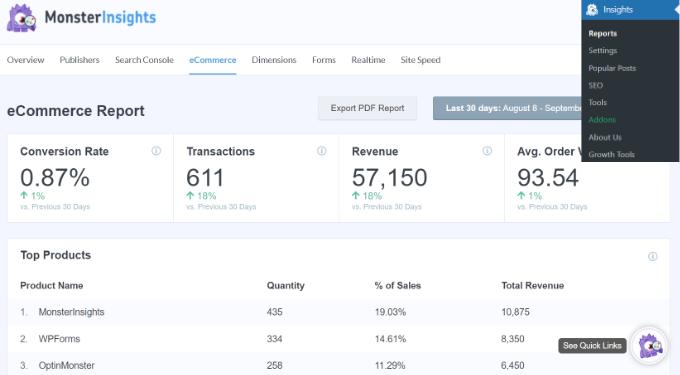
In case you have an internet retailer, then MonsterInsights helps you monitor its efficiency with out enhancing the monitoring script or utilizing Google Tag Supervisor.
It gives an eCommerce addon that allows you to allow eCommerce monitoring in WordPress in only a few clicks. You may see your web site’s total conversion charge, transactions, income, common order worth, top-selling merchandise, and far more.
For extra particulars, please see our information on tips on how to correctly arrange eCommerce monitoring in WordPress.
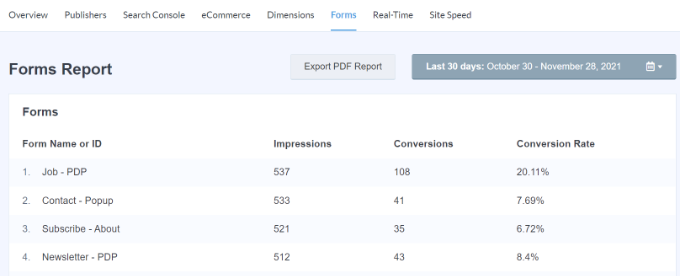
3. Configure Kind Conversions Monitoring
With MonsterInsights, you may also arrange type conversion monitoring in Google Analytics. The plugin gives a Varieties addon that mechanically tracks WordPress types in your web site.
In case you use Google Tag Supervisor, you then’d need to create separate tags for all of your types and monitor them in Google Analytics.
Nevertheless, MonsterInsights makes this course of tremendous easy. Plus, you possibly can view the information contained in the WordPress dashboard.
4. Routinely Allow Scroll Depth Monitoring
Ever marvel how far individuals scroll your internet web page earlier than leaving your web site? Scroll depth monitoring exhibits precisely that and helps you place your banner advertisements and CTAs in the proper place to spice up conversions.
MonsterInsights mechanically permits scroll monitoring in your web site. There is no such thing as a want for extra setup utilizing Google Tag Supervisor or modifying the monitoring code in any respect.
You may learn our information on tips on how to add scroll depth monitoring in WordPress with Google Analytics.
We hope this text helped you discover ways to set up and setup Google Tag Supervisor in WordPress. You might also need to see our information on the final word information to WordPress search engine optimisation and the perfect dwell chat software program for small companies.
In case you appreciated this text, then please subscribe to our YouTube Channel for WordPress video tutorials. You can too discover us on Twitter and Fb.
The submit The right way to Set up and Setup Google Tag Supervisor in WordPress first appeared on WPBeginner.

